> ## Documentation Index
> Fetch the complete documentation index at: https://docs.paradime.io/llms.txt
> Use this file to discover all available pages before exploring further.
# Git Lite
> Simplified Git interface for dbt™ projects with built-in safeguards. Perfect for users starting their Git journey while ensuring proper workflow practices.
export const Arcade = ({src, title}) =>
;
Git Lite simplifies version control for dbt™ projects. It provides a purpose-built Git workflow that keeps you in sync with your main branch, perfect for users new to Git or those who prefer a streamlined interface.
You can choose between Git Lite and Git Advanced in your [IDE preferences](/products/code-ide/user-interface/ide-preferences#git-workflow-preferences)
***
## Branch Management
### Create or switch Branches
Create a new branch to start working on features or fixes without affecting the main branch.
**Step-by-Step Instructions:**
1. **Click the Git icon** in the left panel of the Code IDE
2. **Select "Create Branch"** from the menu
3. **Enter your branch name** (use descriptive names like "feature-user-dashboard")
4. **Click "Create Branch"** to create and switch to your new branch
Paradime will always create a new branch from your remote main/master branch. If switching to an existing branch Paradime will automatically switch branch using your remote selected branch.
### Switching Branches
Move between different branches to work on various features or review changes.
**Step-by-Step Instructions:**
1. **Click the Git Lite icon** (🪄) in the left panel of the Code IDE
2. **Click the branch dropdown** to see available branches
3. **Use the search bar** to find your branch if you have many
4. **Select the branch name** to switch to it
Branch list updates automatically every 30 minutes. Click the refresh button to update manually.
***
### Working with Changes
### Keeping Branches Updated
Git Lite automatically checks if your branch is behind your remote branch and/or your main/master branch. This check happens:
* After each commit you make
* When you click the refresh button manually
* When you switch between branches
**Step-by-Step Instructions:**
1. **Click the Git icon** in the left panel of the Code IDE
2. Click the **refresh** icon in the status section
### Committing Changes
When you have file changes you want to commit, follow these instructions.
**Step-by-Step Instructions:**
1. **Click the Git icon** in the left panel of the Code IDE
2. **Review your changed files** shown in the panel
3. **Enter a clear commit message** describing what you changed
4. **Click "Commit and Push"** to save and upload your changes
You can also discard all changes by clicking on the **`Discard Changes`** button.
**How it works**
**Git Lite automatically:**
* Commits your changes with the provided message
* Pushes changes to your remote branch
* Pulls and merges remote changes if your branch is behind
* Keeps you in sync without manual intervention
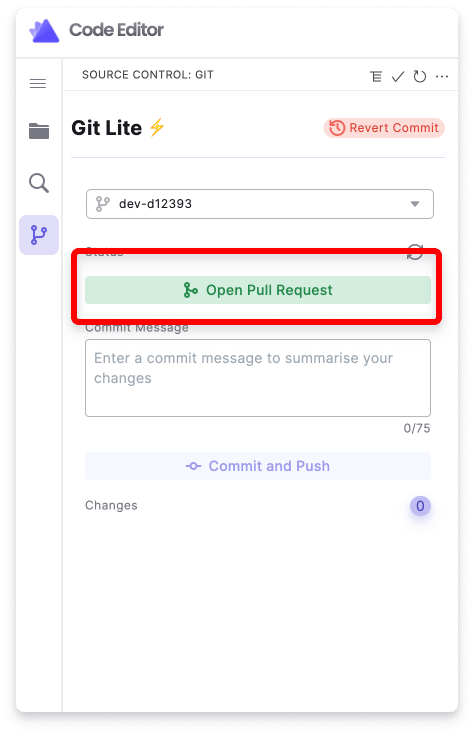
### Open Pull Request
Create a pull request to propose merging your changes into the main branch.
**Step-by-Step Instructions:**
1. **Click the Git icon** in the left panel of the Code IDE
2. **Ensure all changes are committed** by clicking "Commit and Push" first
3. **Click "Open Pull Request"** (only enabled when branch is clean)
4. **Complete the pull request** in your Git provider interface
 ### Reverting Commits
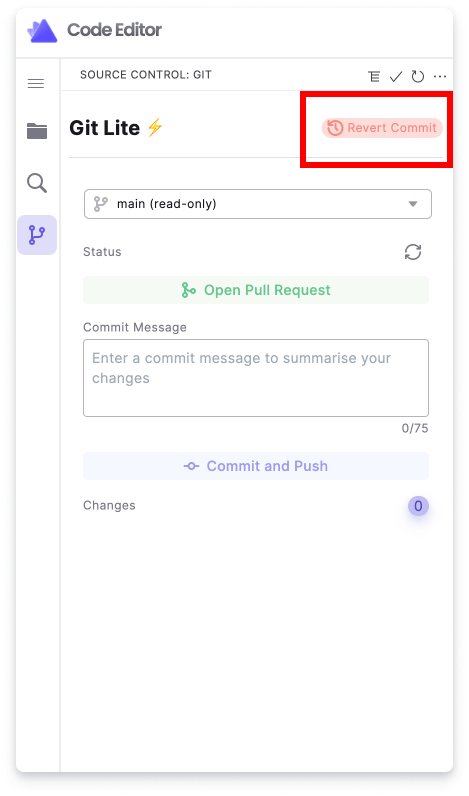
Undo your last commit if you need to fix something or made an error.
**Step-by-Step Instructions:**
1. **Click the Git icon** in the left panel of the Code IDE
2. **Click "Revert Commit"** in the top right corner of the Git Lite panel
3. **Review the commit details** shown in the dialog
4. **Click "Continue"** to revert the last commit
You will see in the dialog the commit details include the commit message, click on `continue` to complete the operation.
### Reverting Commits
Undo your last commit if you need to fix something or made an error.
**Step-by-Step Instructions:**
1. **Click the Git icon** in the left panel of the Code IDE
2. **Click "Revert Commit"** in the top right corner of the Git Lite panel
3. **Review the commit details** shown in the dialog
4. **Click "Continue"** to revert the last commit
You will see in the dialog the commit details include the commit message, click on `continue` to complete the operation.
 ### Merge Conflicts
When merge conflicts occur, Git Lite provides tools to help you resolve them easily.
For detailed instructions on resolving merge conflicts, see our [merge conflict](/guides/working-with-git/merge-conflicts) documentation.
## Related topics
- [Git Lite](/products/code-ide/left-panel/git-lite.md)
- [Delete Branches](/guides/working-with-git/delete-branches.md)
- [Accelerating GitOps](/guides/paradime-101/getting-started-with-the-paradime-ide/dinoai-accelerating-your-analytics-engineering-workflow/accelerating-git-ops.md)
- [Working with Git](/guides/working-with-git/index.md)
- [Git Advanced](/guides/working-with-git/git-advanced.md)
### Merge Conflicts
When merge conflicts occur, Git Lite provides tools to help you resolve them easily.
For detailed instructions on resolving merge conflicts, see our [merge conflict](/guides/working-with-git/merge-conflicts) documentation.
## Related topics
- [Git Lite](/products/code-ide/left-panel/git-lite.md)
- [Delete Branches](/guides/working-with-git/delete-branches.md)
- [Accelerating GitOps](/guides/paradime-101/getting-started-with-the-paradime-ide/dinoai-accelerating-your-analytics-engineering-workflow/accelerating-git-ops.md)
- [Working with Git](/guides/working-with-git/index.md)
- [Git Advanced](/guides/working-with-git/git-advanced.md)