> ## Documentation Index
> Fetch the complete documentation index at: https://docs.paradime.io/llms.txt
> Use this file to discover all available pages before exploring further.
# Amazon S3
Paradime supports using AWS S3 custom buckets in the customer's VPC to store logs and run artifacts generated in each dbt™️ command when running schedules using Bolt.
### 1. Create your own AWS S3 bucket
In your AWS account navigate to [Amazon S3 > Buckets > Create Bucket.](https://s3.console.aws.amazon.com/s3/bucket/create?region=us-east-1) Enter the custom bucket name and select the region where you want to create your bucket in.
The bucket region should be the same as the region where your Paradime instance is hosted. You can find this in [workspace settings](/guides/upgrade-dbt-core-version).
### 2. Create IAM policy
Next [create the IAM policy](https://docs.aws.amazon.com/IAM/latest/UserGuide/access_policies_create-console.html) that provides the minimum required permissions for Paradime to access the Amazon S3 bucket.
Sign in to your AWS account and open the [IAM Management Console](https://console.aws.amazon.com/iam/) and in the navigation pane, choose **Policies**, then **Create policy**.
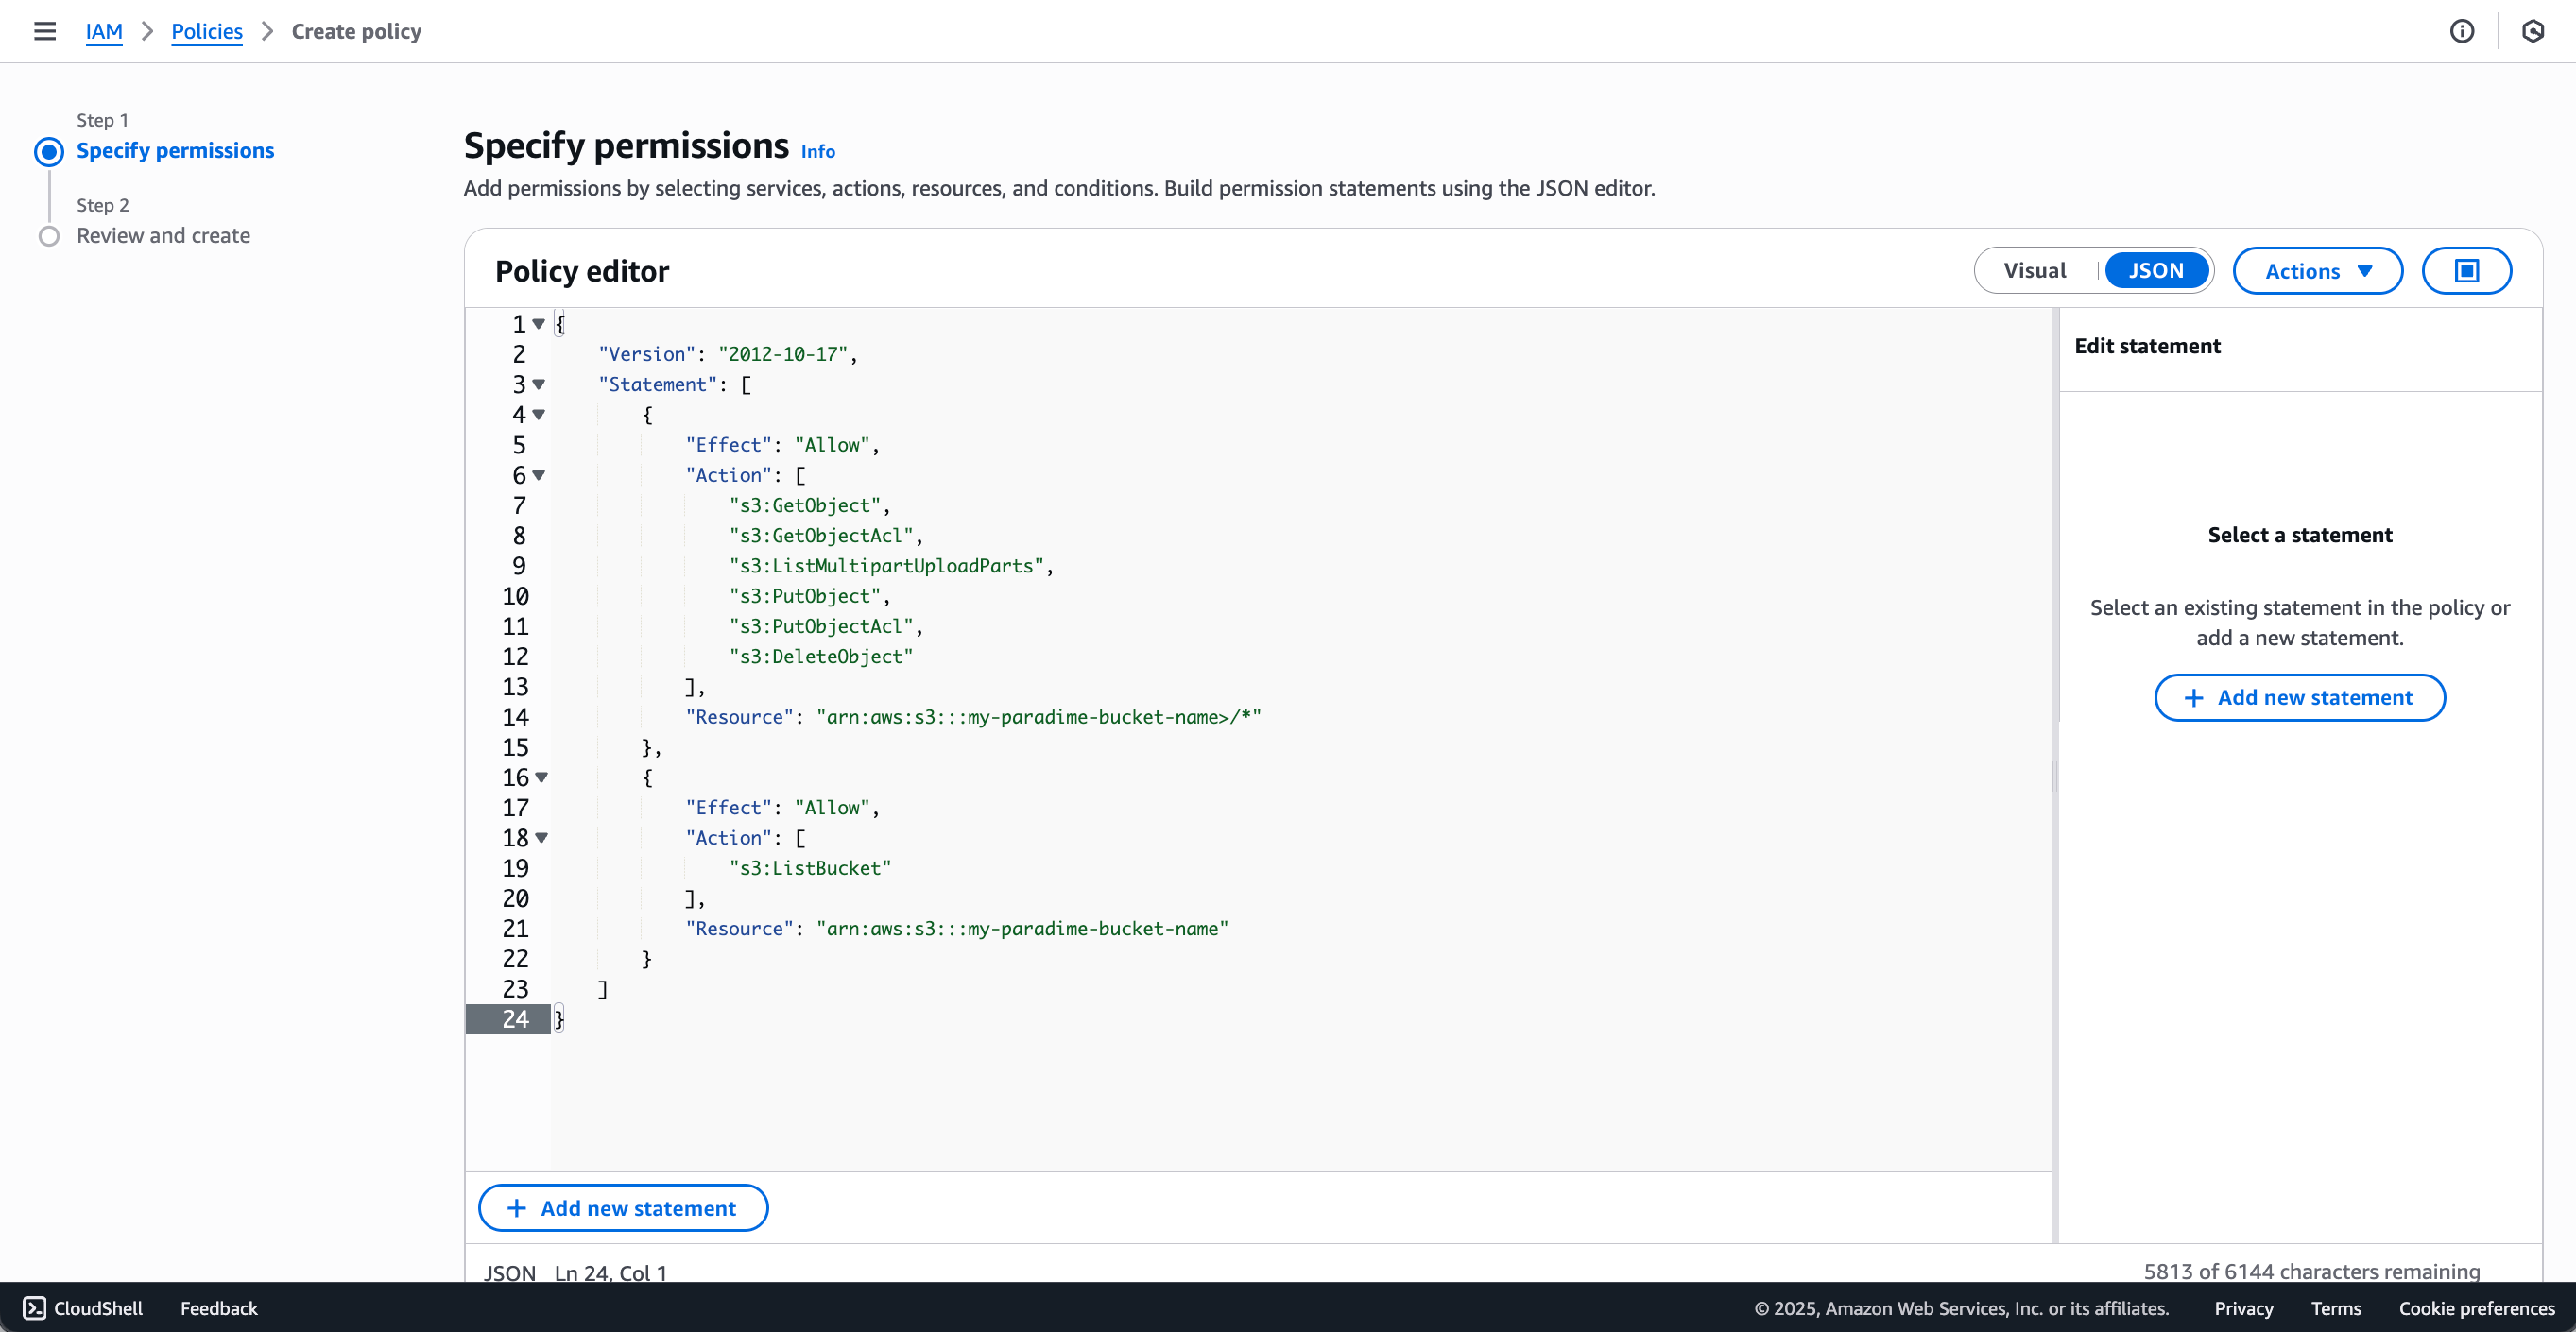 Select the JSON tab and copy the permissions JSON as shown below to create a new IAM policy.
```json theme={"system"}
{
"Version": "2012-10-17",
"Statement": [
{
"Effect": "Allow",
"Action": [
"s3:GetObject",
"s3:GetObjectAcl",
"s3:ListMultipartUploadParts",
"s3:PutObject",
"s3:PutObjectAcl",
"s3:DeleteObject"
],
"Resource": "arn:aws:s3:::/*"
},
{
"Effect": "Allow",
"Action": [
"s3:ListBucket"
],
"Resource": "arn:aws:s3:::"
}
]
}
```
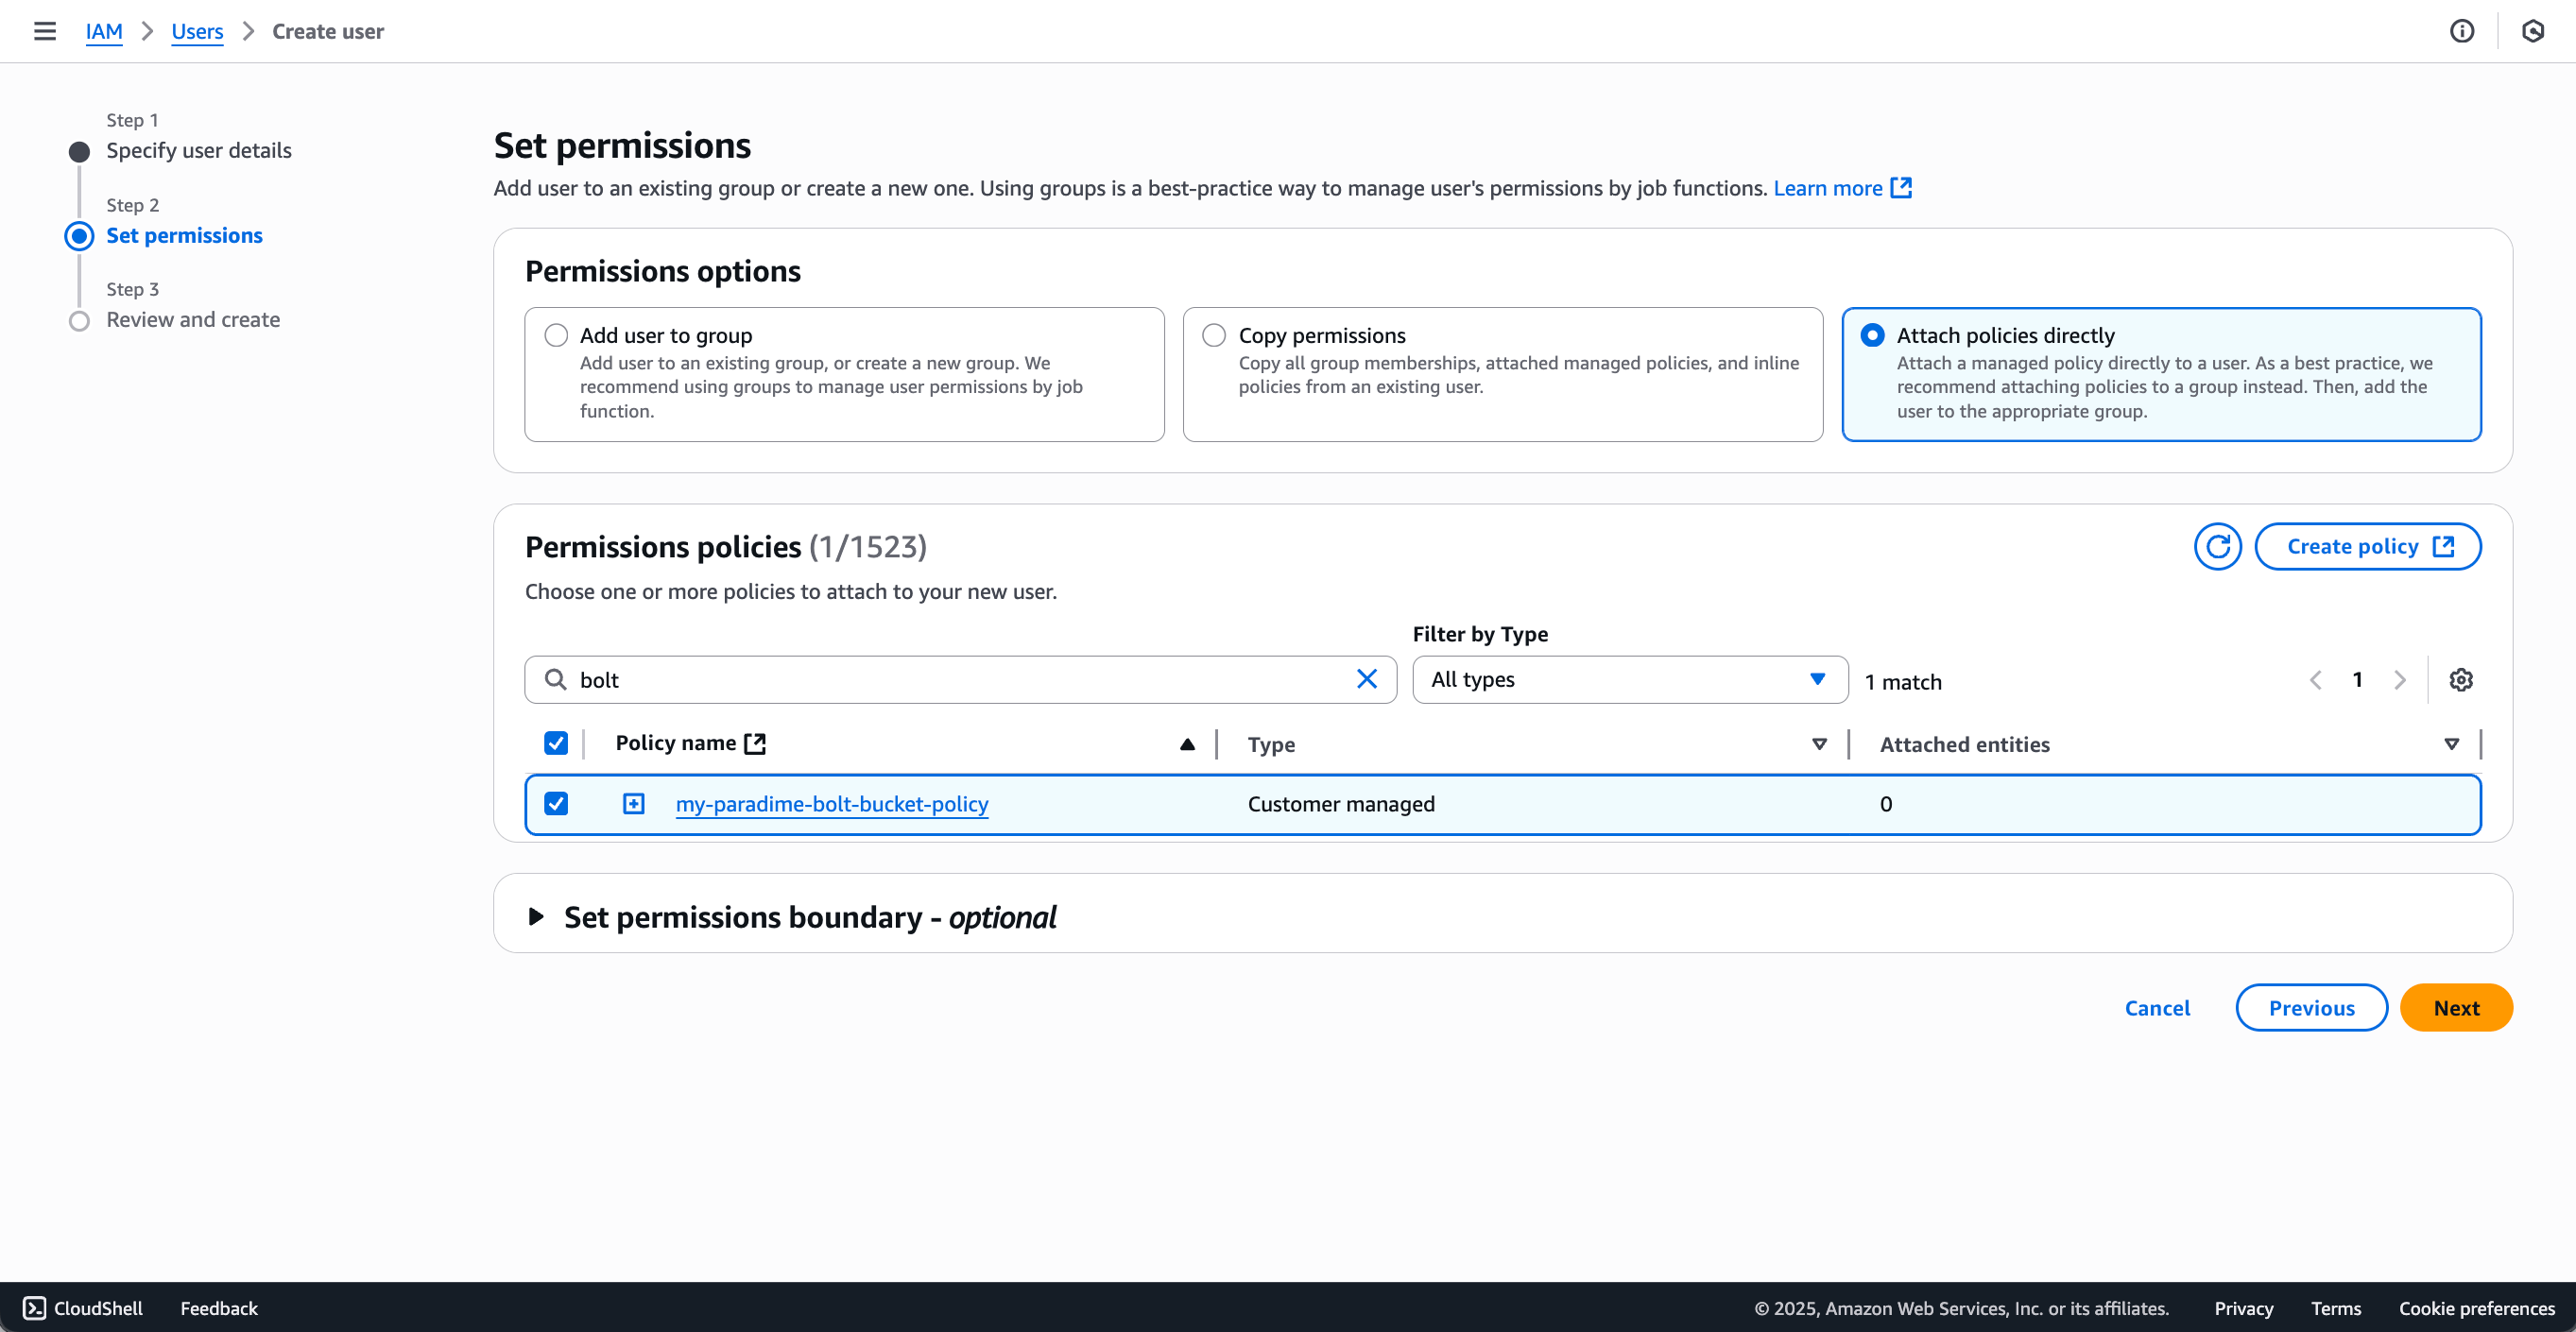
### 3. Create AWS User and attach the previously created IAM policy
* Next [create a new user](https://docs.aws.amazon.com/IAM/latest/UserGuide/id_users_create.html) in AWS
Select the JSON tab and copy the permissions JSON as shown below to create a new IAM policy.
```json theme={"system"}
{
"Version": "2012-10-17",
"Statement": [
{
"Effect": "Allow",
"Action": [
"s3:GetObject",
"s3:GetObjectAcl",
"s3:ListMultipartUploadParts",
"s3:PutObject",
"s3:PutObjectAcl",
"s3:DeleteObject"
],
"Resource": "arn:aws:s3:::/*"
},
{
"Effect": "Allow",
"Action": [
"s3:ListBucket"
],
"Resource": "arn:aws:s3:::"
}
]
}
```
### 3. Create AWS User and attach the previously created IAM policy
* Next [create a new user](https://docs.aws.amazon.com/IAM/latest/UserGuide/id_users_create.html) in AWS
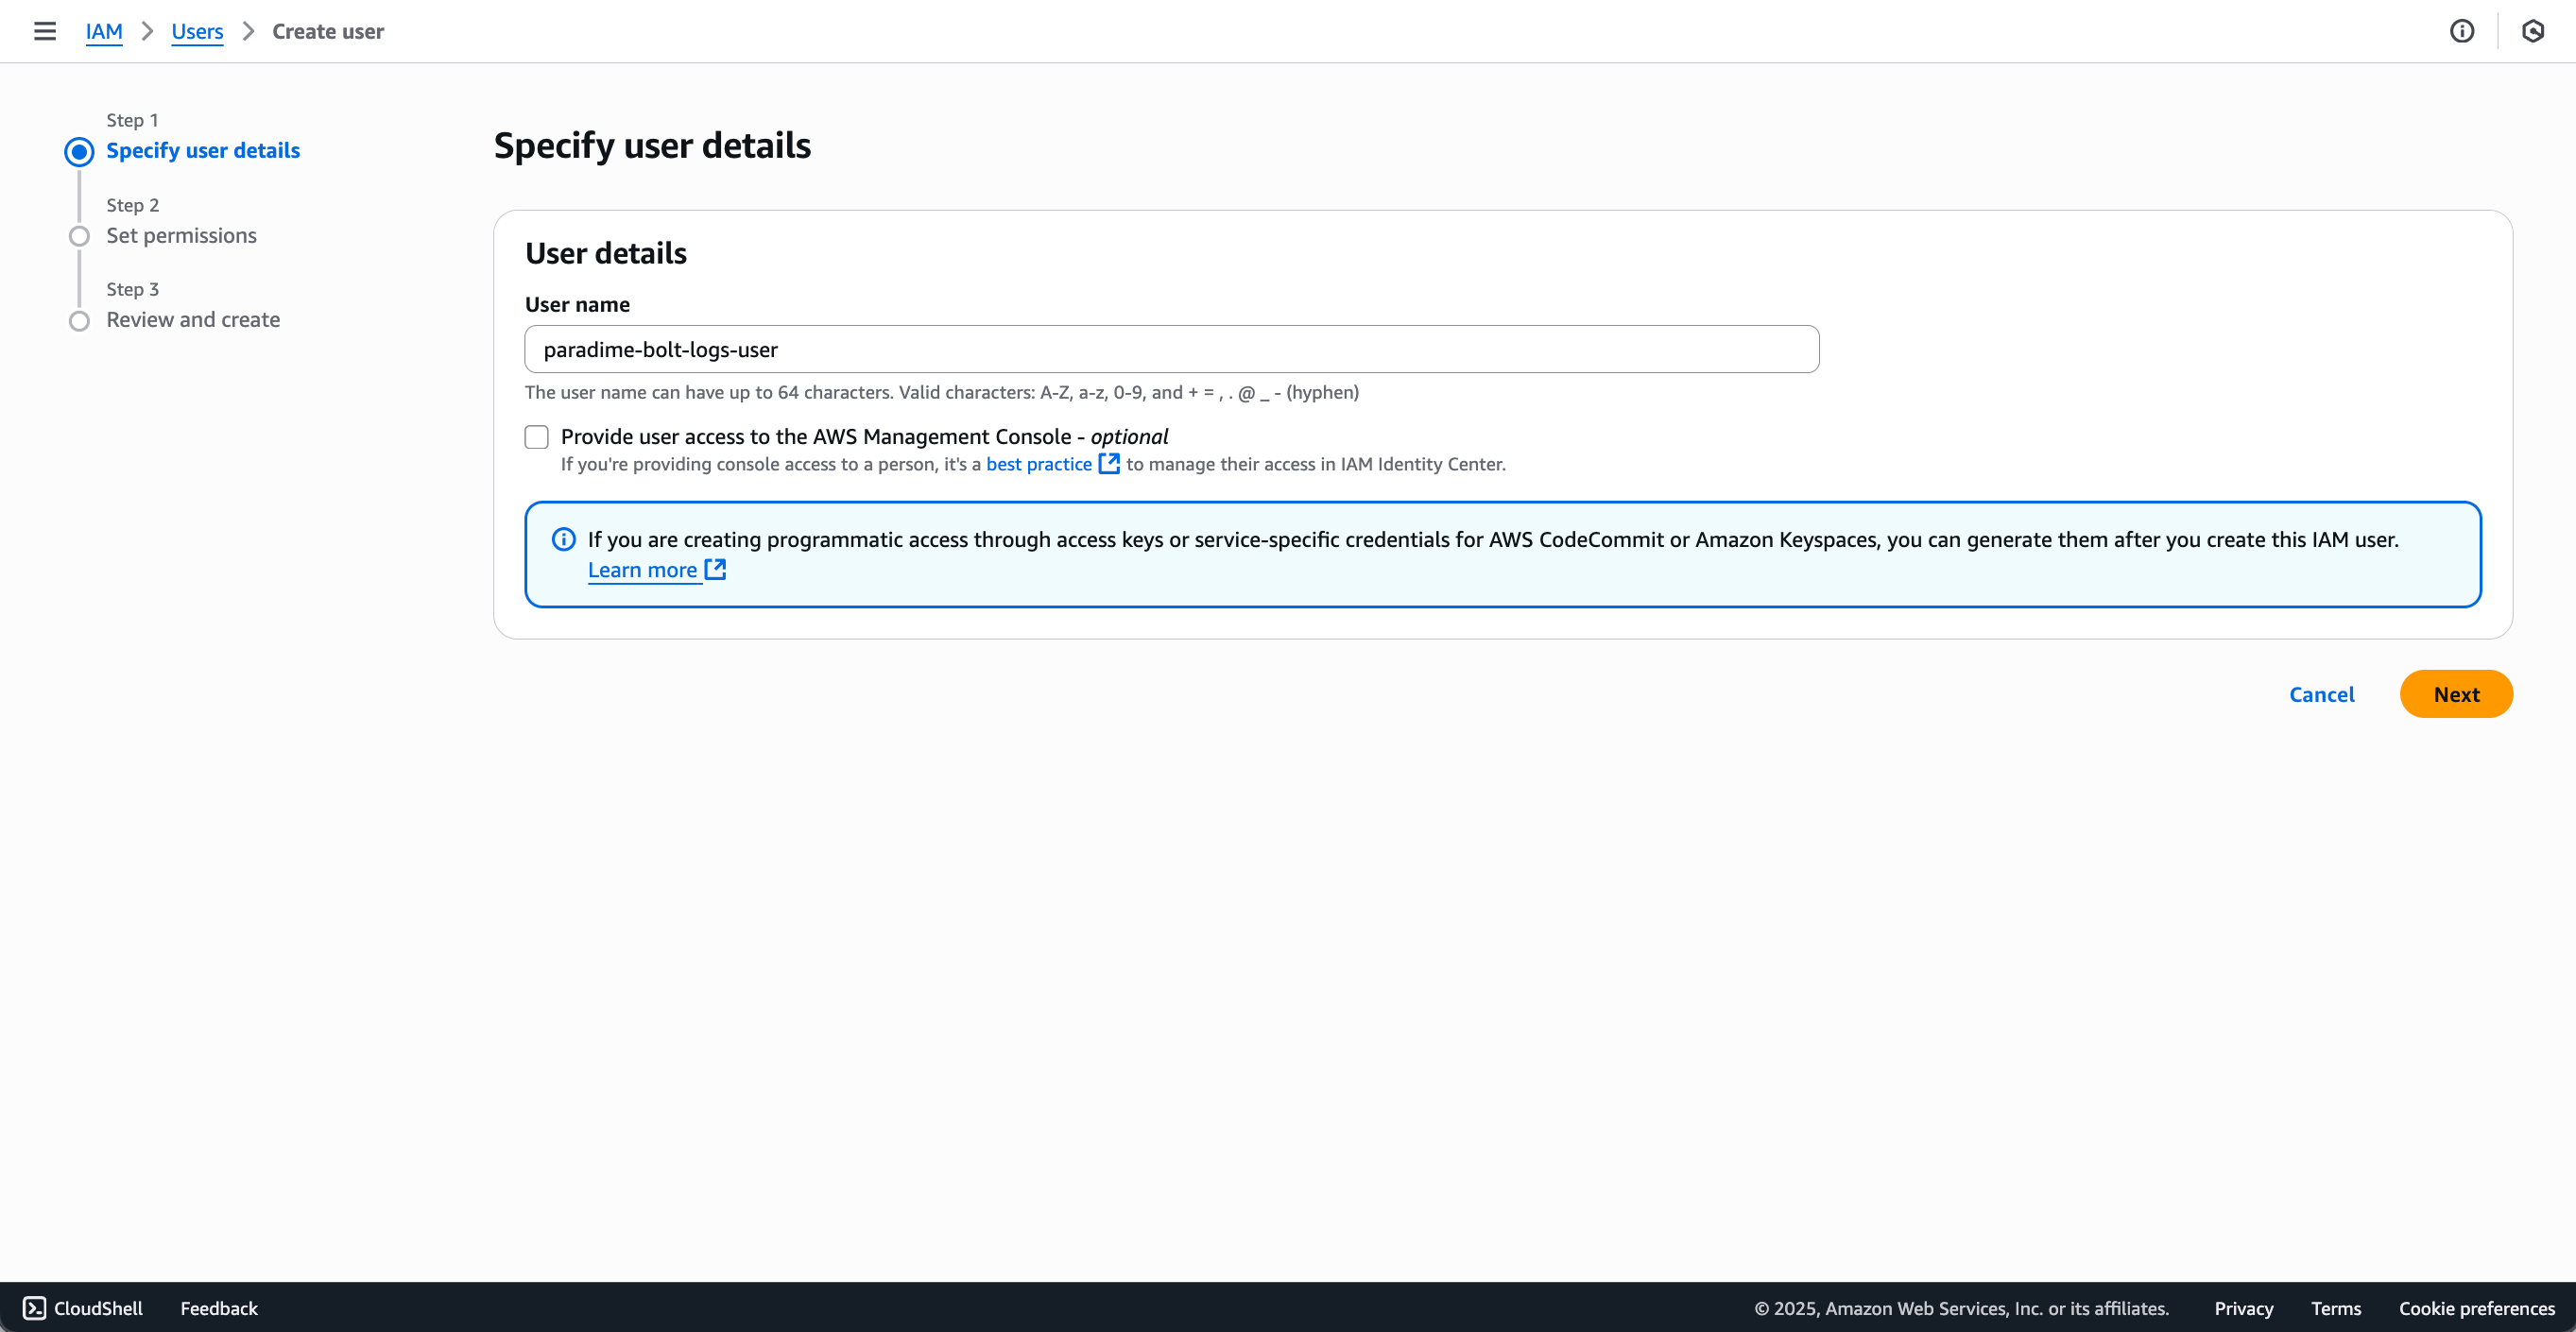 * Assign the IAM policy created in the previous step to this user.
 ### 4. Configure CORS policy for the S3 bucket
Set up the CORS policy to enable Paradime to access files when the request is initiated from the Paradime app.
* In AWS navigate to S3 Bucket and select the Paradime S3 bucket created in the previous steps.
* Select Permissions and then Cross-origin resource sharing (CORS)
* Provide the below configurations
```json theme={"system"}
[
{
"AllowedHeaders": [],
"AllowedMethods": [
"GET"
],
"AllowedOrigins": [
"*.paradime.io"
],
"ExposeHeaders": []
}
]
```
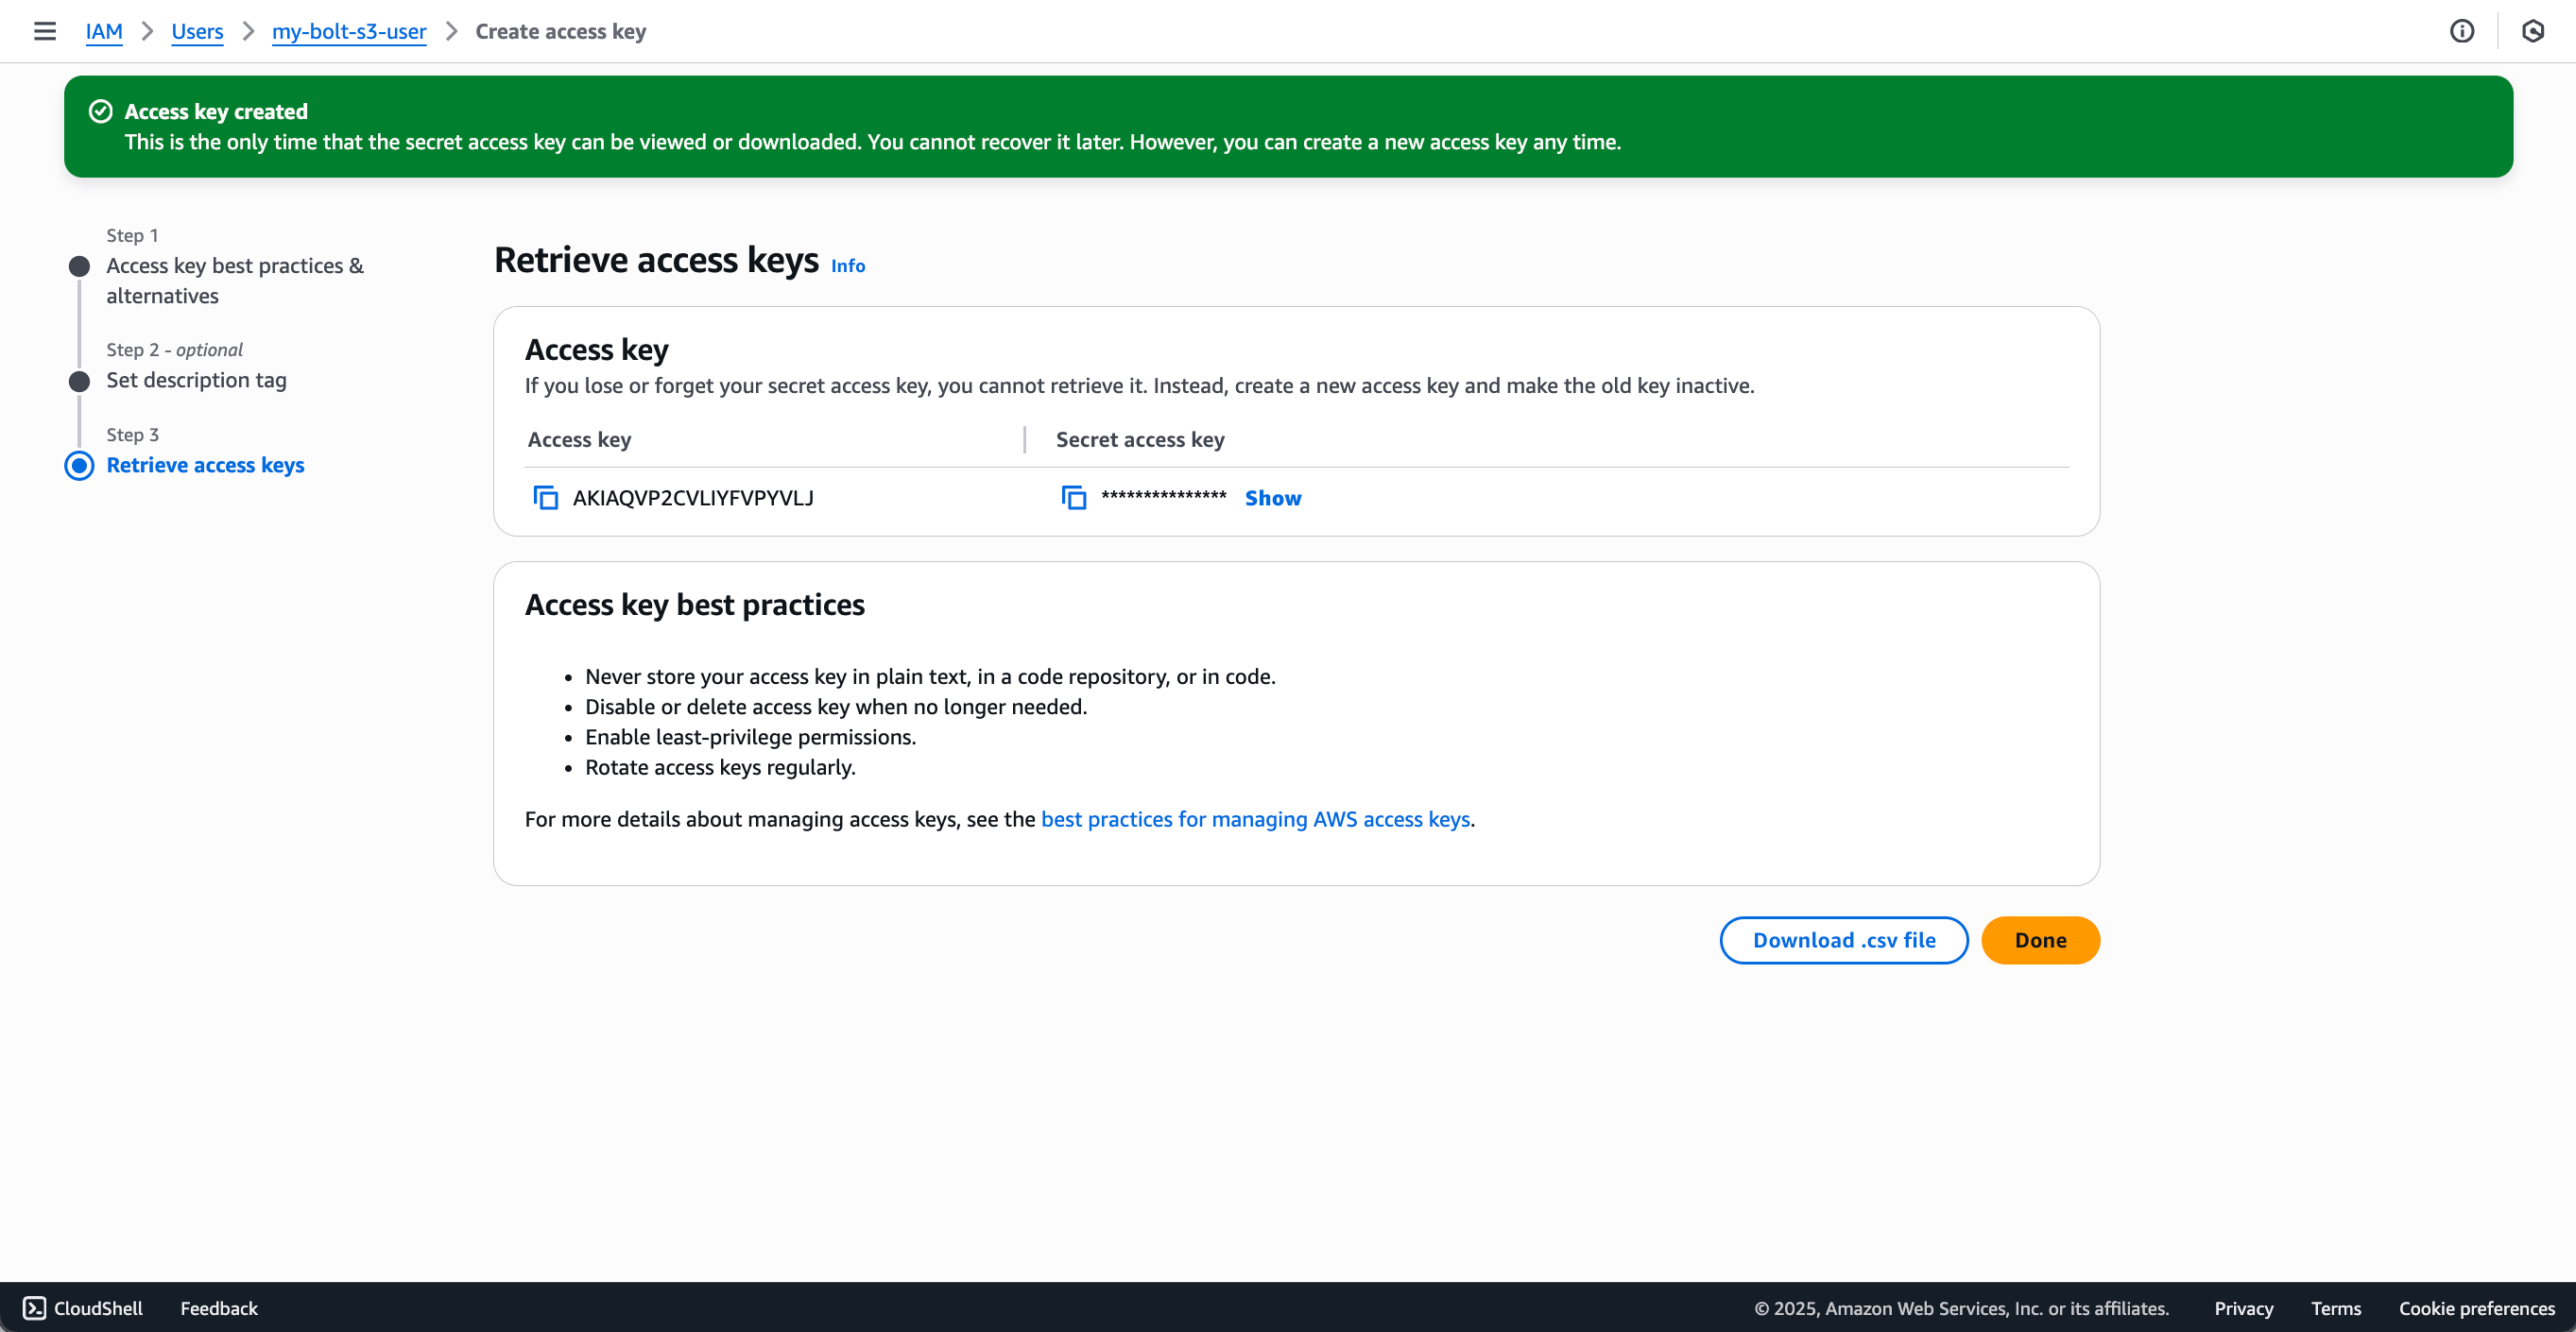
### 5. Create Access Key ID and Secret Access Key
To generate the credentials needed for Paradime integration:
1. Navigate to **IAM > Users** and select the user you created in the previous step
2. Go to the **Security credentials** tab
3. Click **Create Access key**
### 4. Configure CORS policy for the S3 bucket
Set up the CORS policy to enable Paradime to access files when the request is initiated from the Paradime app.
* In AWS navigate to S3 Bucket and select the Paradime S3 bucket created in the previous steps.
* Select Permissions and then Cross-origin resource sharing (CORS)
* Provide the below configurations
```json theme={"system"}
[
{
"AllowedHeaders": [],
"AllowedMethods": [
"GET"
],
"AllowedOrigins": [
"*.paradime.io"
],
"ExposeHeaders": []
}
]
```
### 5. Create Access Key ID and Secret Access Key
To generate the credentials needed for Paradime integration:
1. Navigate to **IAM > Users** and select the user you created in the previous step
2. Go to the **Security credentials** tab
3. Click **Create Access key**
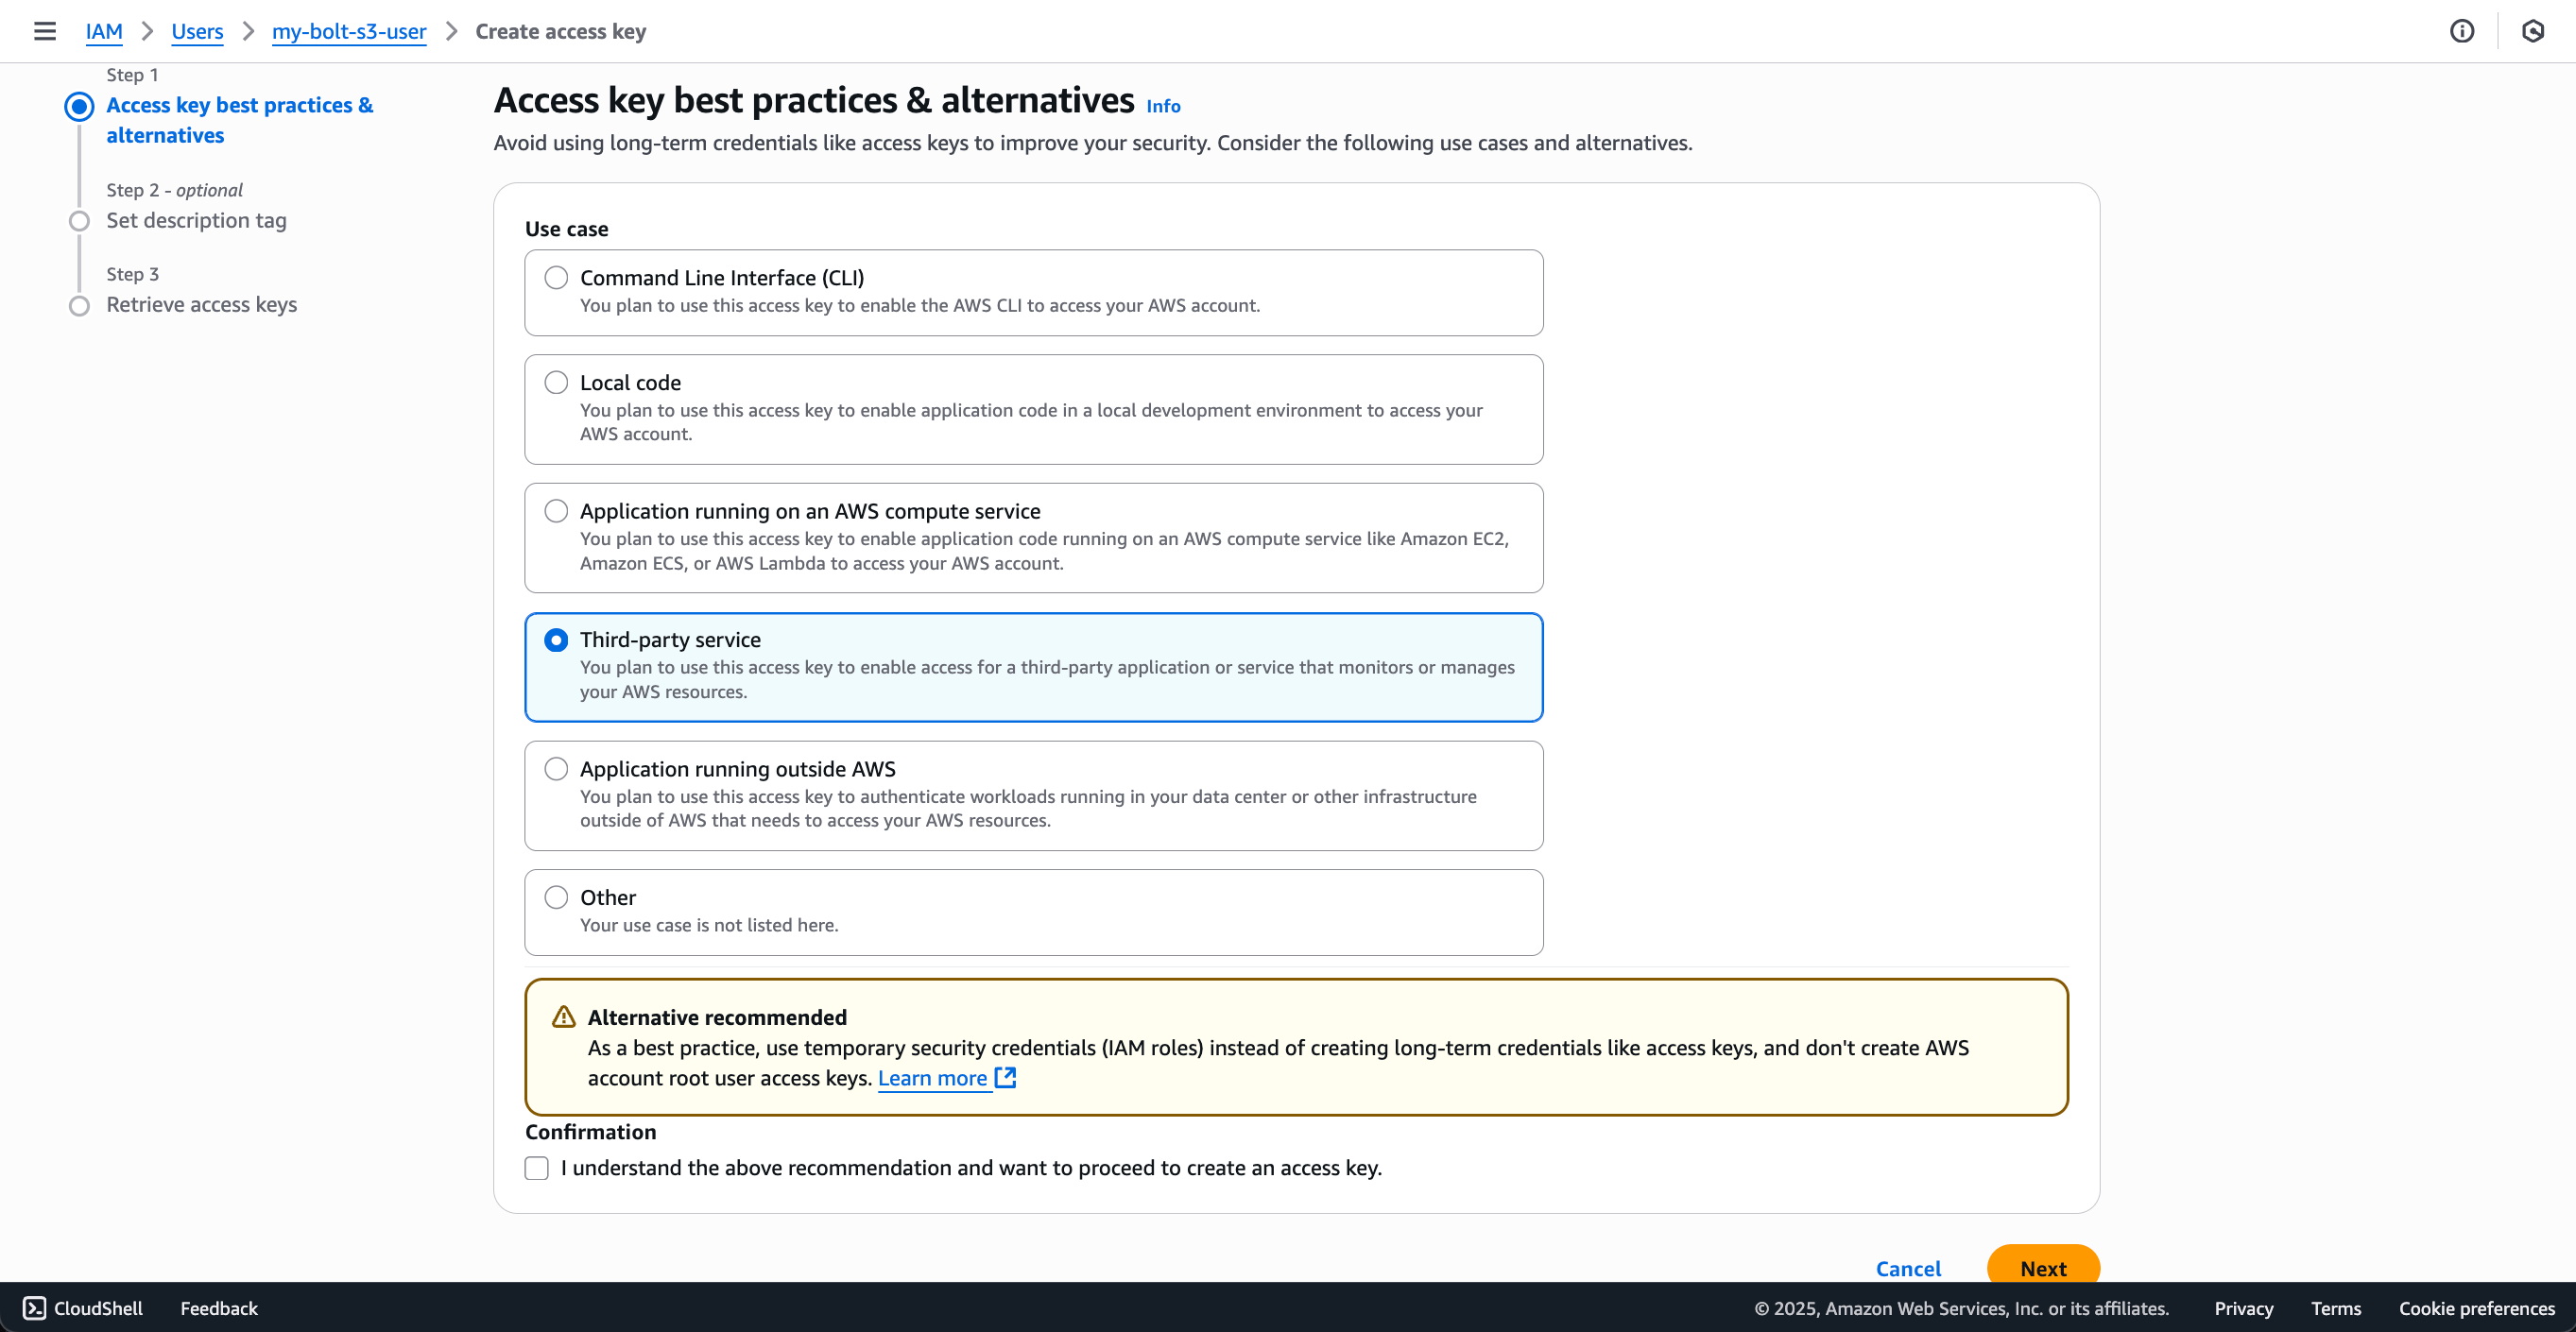 4. On the "Access key best practices & alternatives" page:
* Select **Third-party service** as your use case since Paradime will be accessing your S3 bucket
* AWS will display a warning recommending temporary security credentials (IAM roles) instead of long-term access keys
* Check the confirmation box "I understand the above recommendation and want to proceed to create an access key"
* Click **Next**
5. Optionally add a description tag for the access key
6. Click **Create Access key**
**Important:** Copy and securely store both the **Access Key** and **Secret Access Key** - the secret key will not be shown again
4. On the "Access key best practices & alternatives" page:
* Select **Third-party service** as your use case since Paradime will be accessing your S3 bucket
* AWS will display a warning recommending temporary security credentials (IAM roles) instead of long-term access keys
* Check the confirmation box "I understand the above recommendation and want to proceed to create an access key"
* Click **Next**
5. Optionally add a description tag for the access key
6. Click **Create Access key**
**Important:** Copy and securely store both the **Access Key** and **Secret Access Key** - the secret key will not be shown again
 ### 6. Send the details to the Paradime team
Once the custom S3 bucket and roles are created, reach out to the Paradime team on [support@paradime.io](mailto:support@paradime.io) and securely share the details below via a password manager like Dashlane / 1Password.
* **Bucket Name**
* **Bucket region**
* **Access Key**
* **Secret Access Key**
Once the integration is setup we will create a dummy file `paradime-empty-test-file` in the customer's S3 bucket to test that Paradime can connect and write to it.
From this point onwards, dbt™️ run logs and artifacts will be stored in the custom S3 bucket.
## FAQ: How the dbt™️ artifacts are stored in the S3 buckets?
In the S3 bucket you will see the `Bolt` folder which will contain all the artifacts by schedule name using the below folder structure.
### Example
```text theme={"system"}
bolt
└─ run/
├─ bi_sales_hourly/
├─ bi_sales_daily/
└─ daily_general/
├─ current # in this folder we will add the latest target folder for each command of the schedule
│ ├─ 47531_dbt_seed/
│ └─ 47532_dbt_run/
│ └─ target/
│ ├─ compiled/
│ ├─ run/
│ ├─ graph.gpickle
│ ├─ manifest.json
│ ├─ partial_parse.msgpack
│ └─ run_results.json
│
└─ 2022/
└─ 09/
├─ 16/
├─ 17/
└─ 18/
└─ 58602_1663718545.541192/
├─ 47531_dbt_seed/
└─ 47532_dbt_run/
└─ target/
├─ compiled/
├─ run/
├─ graph.gpickle
├─ manifest.json
├─ partial_parse.msgpack
└─ run_results.json
```
## Related topics
- [Amazon Athena](/products/settings/connections/scheduler-environment/amazon-athena.md)
- [Amazon Quick](/products/dino-ai/mcp-server/amazon-quick.md)
- [Redshift Tools](/products/dino-ai/tools-and-features/warehouse-tool/redshift-tools.md)
### 6. Send the details to the Paradime team
Once the custom S3 bucket and roles are created, reach out to the Paradime team on [support@paradime.io](mailto:support@paradime.io) and securely share the details below via a password manager like Dashlane / 1Password.
* **Bucket Name**
* **Bucket region**
* **Access Key**
* **Secret Access Key**
Once the integration is setup we will create a dummy file `paradime-empty-test-file` in the customer's S3 bucket to test that Paradime can connect and write to it.
From this point onwards, dbt™️ run logs and artifacts will be stored in the custom S3 bucket.
## FAQ: How the dbt™️ artifacts are stored in the S3 buckets?
In the S3 bucket you will see the `Bolt` folder which will contain all the artifacts by schedule name using the below folder structure.
### Example
```text theme={"system"}
bolt
└─ run/
├─ bi_sales_hourly/
├─ bi_sales_daily/
└─ daily_general/
├─ current # in this folder we will add the latest target folder for each command of the schedule
│ ├─ 47531_dbt_seed/
│ └─ 47532_dbt_run/
│ └─ target/
│ ├─ compiled/
│ ├─ run/
│ ├─ graph.gpickle
│ ├─ manifest.json
│ ├─ partial_parse.msgpack
│ └─ run_results.json
│
└─ 2022/
└─ 09/
├─ 16/
├─ 17/
└─ 18/
└─ 58602_1663718545.541192/
├─ 47531_dbt_seed/
└─ 47532_dbt_run/
└─ target/
├─ compiled/
├─ run/
├─ graph.gpickle
├─ manifest.json
├─ partial_parse.msgpack
└─ run_results.json
```
## Related topics
- [Amazon Athena](/products/settings/connections/scheduler-environment/amazon-athena.md)
- [Amazon Quick](/products/dino-ai/mcp-server/amazon-quick.md)
- [Redshift Tools](/products/dino-ai/tools-and-features/warehouse-tool/redshift-tools.md)