> ## Documentation Index
> Fetch the complete documentation index at: https://docs.paradime.io/llms.txt
> Use this file to discover all available pages before exploring further.
# Lightdash
export const Arcade = ({src, title}) =>
;
[Lightdash](https://www.lightdash.com/) transforms your dbt™ project into a full-stack BI platform, enabling self-serve analytics for your entire organization. Paradime's native integration with Lightdash CLI allows you to develop and deploy Lightdash metrics directly from your development environment.
**Prerequisites**
Before getting started, you'll need:
* A Lightdash instance ([Cloud](https://app.lightdash.cloud/) or [Self-hosted](https://docs.lightdash.com/self-host/self-host-lightdash))
* Access to Paradime's Code IDE
* Admin access for setting up credentials
Not sure which Lightdash option to choose? See the [Cloud vs. Self-hosted comparison](https://docs.lightdash.com/self-host/lightdash-cloud-vs-self-hosted).
### Development Setup
#### Authenticating with LightDash
1. In the [Code IDE](/products/code-ide/index), open the Paradime [Integrated Terminal](/products/code-ide/terminal/index)
2. Follow [Lightdash documentation](https://docs.lightdash.com/guides/cli/cli-authentication/) and run authentication commands.
3. Follow the prompts to complete authentication
#### Using Lightdash CL
The Lightdash CLI in Paradime enables you to:
* [Autogenerate Lightdash-ready](https://docs.lightdash.com/guides/cli/how-to-auto-generate-schema-files) YAML files
* [Preview metrics](https://docs.lightdash.com/guides/cli/how-to-use-lightdash-preview) before deployment
* [Deploy changes](https://docs.lightdash.com/guides/cli/how-to-use-lightdash-deploy) to your Lightdash instance
View available commands:
```bash theme={"system"}
lightdash --help
```
## Deployment Setup
Enable automatic deployment of your dbt™ project changes to Lightdash using Paradime [Bolt schedules](/products/bolt/index).
#### 1. Configure Lightdash Credentials
1. From any page in Paradime, Click **Settings**
2. Navigate to **Workspaces > Environment Variables**
3. In the [**Bolt Schedules**](/products/settings/environment-variables/bolt-schedule-env-variables) section, click **Add New**
4. Configure each required variable:
* `LIGHTDASH_API_KEY`: Personal access token
* `LIGHTDASH_PROJECT`: Project UUID
* `LIGHTDASH_URL`: Instance URL
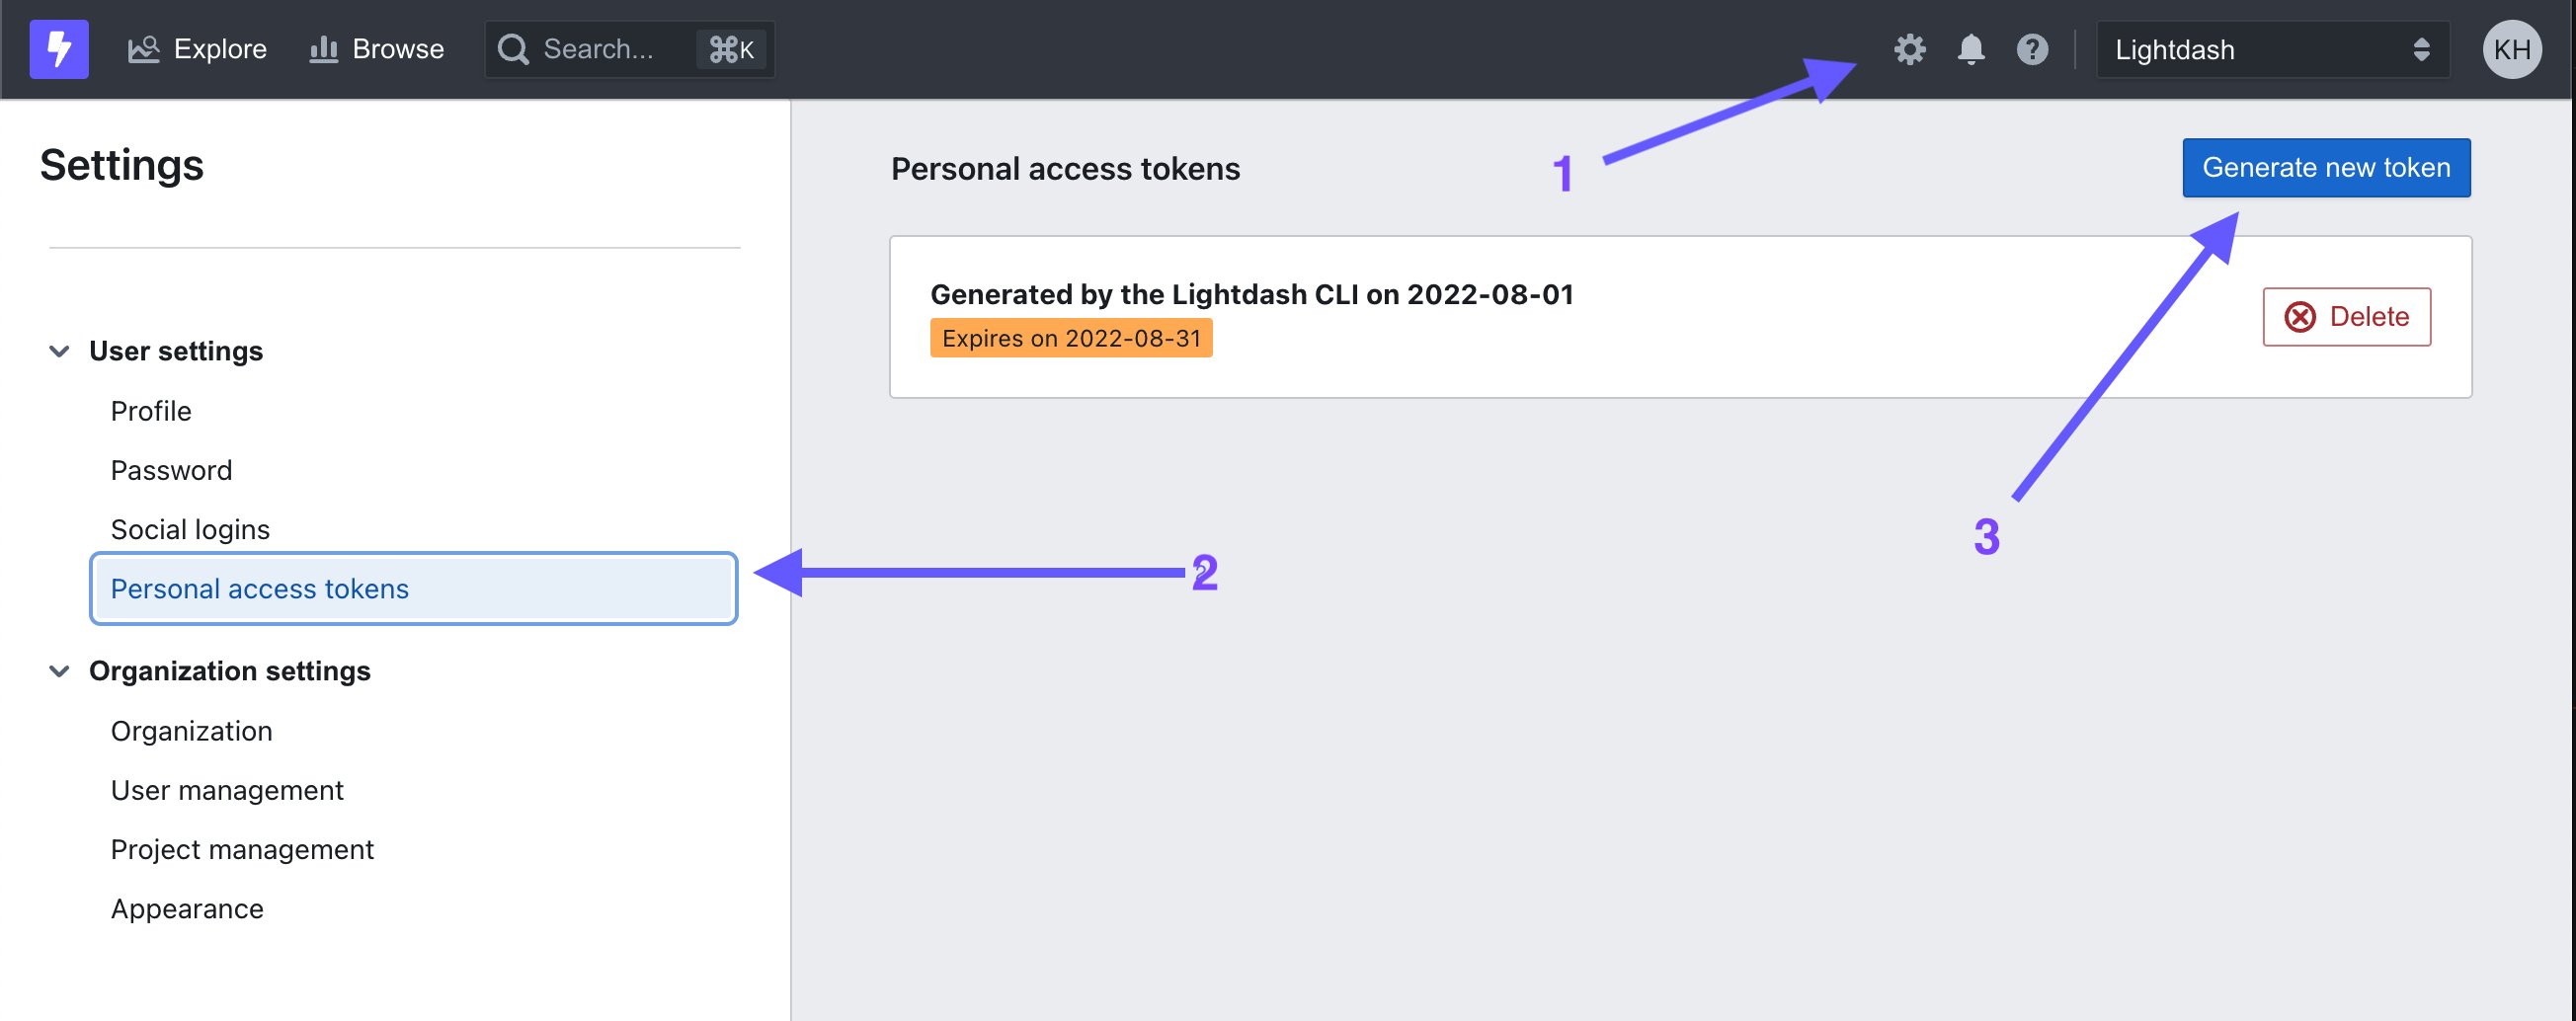
* **`LIGHTDASH_API_KEY`[](https://docs.lightdash.com/guides/cli/how-to-use-lightdash-deploy#lightdash_api_key)**
Create a new personal access token, by going to `Settings` > `Personal Access Tokens`. This is the token you'll put in for `LIGHTDASH_API_KEY`.
 * **`LIGHTDASH_PROJECT`[](https://docs.lightdash.com/guides/cli/how-to-use-lightdash-deploy#lightdash_project)**
The UUID for your project. For example, if your URL looks like `https://eu1.lightdash.cloud/projects/3538ab33-dc90-aabb-bc00-e50bba3a5f69/tables`, then `3538ab33-dc90-45f0-aabb-e50bba3a5f69` is your `LIGHTDASH_PROJECT`
* **`LIGHTDASH_URL`[](https://docs.lightdash.com/guides/cli/how-to-use-lightdash-deploy#lightdash_url)**
This is either `https://eu1.lightdash.cloud` or `https://app.lightdash.cloud` (check the URL to your Lightdash project)
#### 2. Configure Deployment Schedule
1. Create or edit a [Bolt schedule](/products/bolt/index)
2. Add the `lightdash deploy` command
3. This will:
* Execute after your dbt™ commands complete
* Deploy changes to your Lightdash project
* Keep metrics in sync with your dbt™ project
You can configure this as part of a [CD schedule](/products/bolt/ci-cd/continuous-deployment-with-bolt/continuous-deployment) to deploy changes automatically after PR merges.
[https://docs.lightdash.com/guides/cli/how-to-use-lightdash-deploy#automatically-deploy-your-changes-to-lightdash-using-a-github-action](https://docs.lightdash.com/guides/cli/how-to-use-lightdash-deploy#automatically-deploy-your-changes-to-lightdash-using-a-github-action)
## Related topics
- [Lightdash Commands](/products/bolt/creating-schedules/command-settings/lightdash-commands.md)
- [CLI and feature availability errors](/get-help/error-list/cli-and-feature-availability-errors.md)
- [3. Command Settings](/products/bolt/creating-schedules/command-settings/index.md)
* **`LIGHTDASH_PROJECT`[](https://docs.lightdash.com/guides/cli/how-to-use-lightdash-deploy#lightdash_project)**
The UUID for your project. For example, if your URL looks like `https://eu1.lightdash.cloud/projects/3538ab33-dc90-aabb-bc00-e50bba3a5f69/tables`, then `3538ab33-dc90-45f0-aabb-e50bba3a5f69` is your `LIGHTDASH_PROJECT`
* **`LIGHTDASH_URL`[](https://docs.lightdash.com/guides/cli/how-to-use-lightdash-deploy#lightdash_url)**
This is either `https://eu1.lightdash.cloud` or `https://app.lightdash.cloud` (check the URL to your Lightdash project)
#### 2. Configure Deployment Schedule
1. Create or edit a [Bolt schedule](/products/bolt/index)
2. Add the `lightdash deploy` command
3. This will:
* Execute after your dbt™ commands complete
* Deploy changes to your Lightdash project
* Keep metrics in sync with your dbt™ project
You can configure this as part of a [CD schedule](/products/bolt/ci-cd/continuous-deployment-with-bolt/continuous-deployment) to deploy changes automatically after PR merges.
[https://docs.lightdash.com/guides/cli/how-to-use-lightdash-deploy#automatically-deploy-your-changes-to-lightdash-using-a-github-action](https://docs.lightdash.com/guides/cli/how-to-use-lightdash-deploy#automatically-deploy-your-changes-to-lightdash-using-a-github-action)
## Related topics
- [Lightdash Commands](/products/bolt/creating-schedules/command-settings/lightdash-commands.md)
- [CLI and feature availability errors](/get-help/error-list/cli-and-feature-availability-errors.md)
- [3. Command Settings](/products/bolt/creating-schedules/command-settings/index.md)