> ## Documentation Index
> Fetch the complete documentation index at: https://docs.paradime.io/llms.txt
> Use this file to discover all available pages before exploring further.
# State Diagrams
### What are State Diagrams?
Marmaid's State diagrams are used to describe the behavior of systems by representing states and transitions between them. They are particularly useful in software development, engineering, and process modeling. Each state represents a condition, and transitions show how one state changes to another.
#### Purpose
State diagrams provide:
* A clear visualization of system behavior.
* Easy identification of states and transitions.
* Simplified modeling of finite state machines.
Mermaid supports state diagrams with flexible syntax, allowing users to create dynamic and visually engaging models.
***
### Creating Your First State Diagram
1. **Launch DinoAI:** From Code IDE, access [DinoAI](/products/dino-ai/index) to start creating diagrams.
2. **Use a Simple Prompt:** Tell DinoAI what kind of State Diagram you want to create. For example:
```text theme={"system"}
- "Create a mermaid state diagram showing data pipeline job states from queued to completed"
- "Generate a mermaid state diagram for my dbt™ model refresh process with all possible states"
- "Build a mermaid state diagram showing data quality check states and transitions"
```
3. **Get Your Diagram:** DinoAI will generate a complete `.mmd` file with proper Mermaid syntax.
4. **Preview Your Work:** Click the eye icon (👁️) to preview your diagram in real-time as you edit.
5. **Iterate and Refine:** Modify the generated `.mmd` file directly, or ask DinoAI to make specific changes.
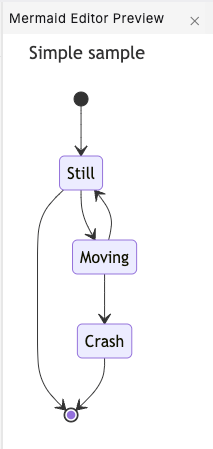
#### Example:
```mermaid theme={"system"}
---
title: Simple sample
---
stateDiagram-v2
[*] --> Still
Still --> [*]
Still --> Moving
Moving --> Still
Moving --> Crash
Crash --> [*]
```
 **Reusable State Diagram prompts for you and your team**
You can create custom, standardized [.dinoprompts](/products/dino-ai/copilot/dino-prompts) for Mermaid's State Diagram that ensure consistency across your data team. See [step-by-step guide.](/integrations/mermaid-js/index#creating-mermaid-diagrams-with-.dinoprompts)
***
### Diagram Syntax Guide
#### States
Define states using either a simple ID or a descriptive label:
```mermaid theme={"system"}
stateDiagram-v2
state "This is a state description" as s2
s2: Another description
```
#### Transitions
Transitions represent the movement between states using `-->`:
```mermaid theme={"system"}
stateDiagram-v2
s1 --> s2: Transition Label
```
#### Start and End States
Indicate start and end states with `[ * ]`:
```mermaid theme={"system"}
stateDiagram-v2
[*] --> s1
s1 --> [*]
```
#### Composite States
Define states with internal sub-states:
```mermaid theme={"system"}
stateDiagram-v2
[*] --> Composite
state Composite {
[*] --> SubState1
SubState1 --> SubState2
SubState2 --> [*]
}
```
#### Conditional Paths
Model choices or forks using `<>`:
```mermaid theme={"system"}
stateDiagram-v2
state choice <>
s1 --> choice
choice --> s2: Yes
choice --> s3: No
```
***
### Advanced Features
#### Concurrency
Represent concurrent states:
```mermaid theme={"system"}
stateDiagram-v2
[*] --> Active
state Active {
[*] --> SubState1
--
[*] --> SubState2
}
```
#### Notes
Add notes for clarity:
```mermaid theme={"system"}
stateDiagram-v2
State1: A state with a note
note right of State1: This is additional information.
State1 --> State2
```
#### Styling States
Use `classDef` to define styles and apply them to states:
```mermaid theme={"system"}
stateDiagram
classDef highlighted fill:#f96,stroke:#333;
State1 --> State2
class State1 highlighted
```
***
### Data Team Examples
#### Workflow Example
```mermaid theme={"system"}
stateDiagram-v2
[*] --> DataPreparation
DataPreparation --> Analysis
Analysis --> Visualization
Visualization --> [*]
```
#### System State Example
```mermaid theme={"system"}
stateDiagram-v2
[*] --> Idle
Idle --> Active
Active --> Error
Error --> Idle
Error --> [*]
```
***
### Best Practices
1. **Plan Transitions**: Clearly define all state transitions.
2. **Use Descriptive Labels**: Label states and transitions for clarity.
3. **Group Related States**: Use composite states for better organization.
4. **Add Notes**: Include notes to explain complex transitions.
5. **Iterate**: Continuously refine your diagram for accuracy.
***
### Troubleshooting and Tips
#### Common Issues
* **Unlinked States**: Ensure all states are connected with transitions.
* **Overlapping Elements**: Adjust layout using composite states or direction settings.
#### Modular Design
Divide complex diagrams into smaller sections for readability.
***
**Additional Resources**
For more details, visit the [official Mermaid documentation](https://mermaid.js.org/syntax/stateDiagram.html).
## Related topics
- [Mermaid](/integrations/mermaid-js/index.md)
- [Architecture Diagrams](/integrations/mermaid-js/architecture-diagrams.md)
- [Timeline Diagrams](/integrations/mermaid-js/timeline-diagrams.md)
- [Block Diagrams](/integrations/mermaid-js/block-diagrams.md)
- [Class Diagrams](/integrations/mermaid-js/class-diagrams.md)
**Reusable State Diagram prompts for you and your team**
You can create custom, standardized [.dinoprompts](/products/dino-ai/copilot/dino-prompts) for Mermaid's State Diagram that ensure consistency across your data team. See [step-by-step guide.](/integrations/mermaid-js/index#creating-mermaid-diagrams-with-.dinoprompts)
***
### Diagram Syntax Guide
#### States
Define states using either a simple ID or a descriptive label:
```mermaid theme={"system"}
stateDiagram-v2
state "This is a state description" as s2
s2: Another description
```
#### Transitions
Transitions represent the movement between states using `-->`:
```mermaid theme={"system"}
stateDiagram-v2
s1 --> s2: Transition Label
```
#### Start and End States
Indicate start and end states with `[ * ]`:
```mermaid theme={"system"}
stateDiagram-v2
[*] --> s1
s1 --> [*]
```
#### Composite States
Define states with internal sub-states:
```mermaid theme={"system"}
stateDiagram-v2
[*] --> Composite
state Composite {
[*] --> SubState1
SubState1 --> SubState2
SubState2 --> [*]
}
```
#### Conditional Paths
Model choices or forks using `<>`:
```mermaid theme={"system"}
stateDiagram-v2
state choice <>
s1 --> choice
choice --> s2: Yes
choice --> s3: No
```
***
### Advanced Features
#### Concurrency
Represent concurrent states:
```mermaid theme={"system"}
stateDiagram-v2
[*] --> Active
state Active {
[*] --> SubState1
--
[*] --> SubState2
}
```
#### Notes
Add notes for clarity:
```mermaid theme={"system"}
stateDiagram-v2
State1: A state with a note
note right of State1: This is additional information.
State1 --> State2
```
#### Styling States
Use `classDef` to define styles and apply them to states:
```mermaid theme={"system"}
stateDiagram
classDef highlighted fill:#f96,stroke:#333;
State1 --> State2
class State1 highlighted
```
***
### Data Team Examples
#### Workflow Example
```mermaid theme={"system"}
stateDiagram-v2
[*] --> DataPreparation
DataPreparation --> Analysis
Analysis --> Visualization
Visualization --> [*]
```
#### System State Example
```mermaid theme={"system"}
stateDiagram-v2
[*] --> Idle
Idle --> Active
Active --> Error
Error --> Idle
Error --> [*]
```
***
### Best Practices
1. **Plan Transitions**: Clearly define all state transitions.
2. **Use Descriptive Labels**: Label states and transitions for clarity.
3. **Group Related States**: Use composite states for better organization.
4. **Add Notes**: Include notes to explain complex transitions.
5. **Iterate**: Continuously refine your diagram for accuracy.
***
### Troubleshooting and Tips
#### Common Issues
* **Unlinked States**: Ensure all states are connected with transitions.
* **Overlapping Elements**: Adjust layout using composite states or direction settings.
#### Modular Design
Divide complex diagrams into smaller sections for readability.
***
**Additional Resources**
For more details, visit the [official Mermaid documentation](https://mermaid.js.org/syntax/stateDiagram.html).
## Related topics
- [Mermaid](/integrations/mermaid-js/index.md)
- [Architecture Diagrams](/integrations/mermaid-js/architecture-diagrams.md)
- [Timeline Diagrams](/integrations/mermaid-js/timeline-diagrams.md)
- [Block Diagrams](/integrations/mermaid-js/block-diagrams.md)
- [Class Diagrams](/integrations/mermaid-js/class-diagrams.md)