> ## Documentation Index
> Fetch the complete documentation index at: https://docs.paradime.io/llms.txt
> Use this file to discover all available pages before exploring further.
# Monte Carlo
### What is Monte Carlo?
[Monte Carlo](https://www.montecarlodata.com/) is a leading **data observability platform** that helps data teams monitor, resolve, and prevent data quality issues. It provides insights into the **health, freshness, and lineage** of your data assets across your entire data stack.
### Value of Monte Carlo with Paradime
Integrating Monte Carlo with Paradime enables teams to centralize **data observability** and enhance the monitoring of production jobs (Bolt schedules) and dbt™ models. Key benefits include:
* **Enhanced Observability**: Overlay dbt™ context onto Monte Carlo's lineage graph for easier troubleshooting.
* **Incident Detection**: Detect and centralize dbt™ model errors, test failures, and other data incidents in one place.
* **Run Insights**: Visualize dbt™ job execution times, success/error statuses, and run histories.
* **Simplified Impact Analysis**: Evaluate downstream and upstream impacts of dbt™ transformations on table updates.
With this integration, data teams can **proactively address failures**, **optimize dbt**™ **models**, and ensure **reliable data pipelines**.
***
### Setting Up the Integration
Follow these steps to configure the Monte Carlo integration within Paradime.
#### Step 1: Generate API Key and API ID
1. Log in to your Monte Carlo account.
2. Follow the instructions in [Monte Carlo Docs](https://docs.getmontecarlo.com/docs/developer-resources#creating-an-api-key) to generate:
* **API Key**
* **API ID**
The key is required to be generated with the "Editor" or "Owner" roles, for example if you create a Service Account Key you need to select "Editors" or "Account Owners" under "Authorization Groups".
If you're using a personal key, the user that generated it needs to be an "Editor" or "Owner".
***
#### Step 2: Add API Credentials to Paradime
1. From the Paradime home page, click the Settings icon (⚙️) on the bottom right hand side of the screen
2. Navigate to *Workspaces >* [*Environment Variables*](/products/settings/environment-variables/bolt-schedule-env-variables)
3. In the Bolt Schedules section, add the following variables and their respective values from Step 1:
* `MCD_DEFAULT_API_TOKEN`
* `MCD_DEFAULT_API_ID`
4. Click the Save icon (💾)
Step 3: Set Your Project Name
***
#### Step 3: Set Your Project Name
* In the same Bolt Schedules section, add:
* `MONTECARLO_PROJECT_NAME`
* Set a value for the project name
You can reuse [your existing dbt project name](/guides/dbt-fundamentals/configuring-your-dbt-project/setting-up-your-dbt_project.yml#project-name-and-version) or create any name that aligns with your dbt models.
***
#### Step 4: Obtain the Connection ID
The **Connection ID** identifies the warehouse or lake connection in Monte Carlo. You can do this by retrieving the connection UUID via the [getUser](https://apidocs.getmontecarlo.com/#query-getUser) API through the [API Explorer](https://docs.getmontecarlo.com/docs/api-explorer) by running the below query.
```graphql theme={"system"}
query getConnections {
getUser {
email
account {
connections {
uuid
type
warehouse {
name
}
}
}
}
}
```
```json theme={"system"}
{
"data": {
"getUser": {
"email": "example@montecarlodata.com",
"account": {
"connections": [{
"uuid": "9b265c4d-931f-4584-99c6-42ea37155a99",
"type": "SNOWFLAKE",
"warehouse": {
"name": "snowflake-artemis"
}
}]
}
}
}
}
```
If you prefer you can also use the [list](https://clidocs.getmontecarlo.com/#montecarlo-integrations-list) command in the Monte Carlo CLI to retrieve your connection ID (UUID).
```markdown theme={"system"}
% montecarlo integrations list
╒════════════════════════╤══════════════════╤══════════════════════════════════════╤═════════════════════════════════════════════════════════╕
│ Integration │ Name │ ID │ Connection │ Created on (UTC) │
╞════════════════════════╪══════════════════╪══════════════════════════════════════╪══════════════════════╪══════════════════════════════════╡
│ Redshift │ prod-redshift │ 12345678-1234-1234-1234-123456789012 │ host: redacted │ 2022-12-14T14:54:15.944774+00:00 │
├────────────────────────┼──────────────────┼──────────────────────────────────────┼──────────────────────┼──────────────────────────────────┤
│ BigQuery │ prod-bigquery │ 12345678-1234-1234-1234-123456789013 │ client_id: redacted │ 2022-12-14T18:02:54.644654+00:00 │
╘════════════════════════╧══════════════════╧══════════════════════════════════════╧══════════════════════╧══════════════════════════════════╛
```
***
#### Step 5: Add the Connection ID
1. Copy the **Connection ID** from the logs.
2. Go back to the [**Environment Variables**](/products/settings/environment-variables/bolt-schedule-env-variables) section in Paradime.
3. Add the following variable:
* `MONTECARLO_CONNECTION_ID`
4. Click **Save** to confirm.
***
#### Step 6: Enable the Integration
This Flag will enable uploading automatically all schedules dbt run artifacts to Montecarlo.
1. In the same [**Environment Variables**](/products/settings/environment-variables/bolt-schedule-env-variables) section, add the following variable:
* `RUN_MONTECARLO_UPLOAD`
2. Set its value to `TRUE`.
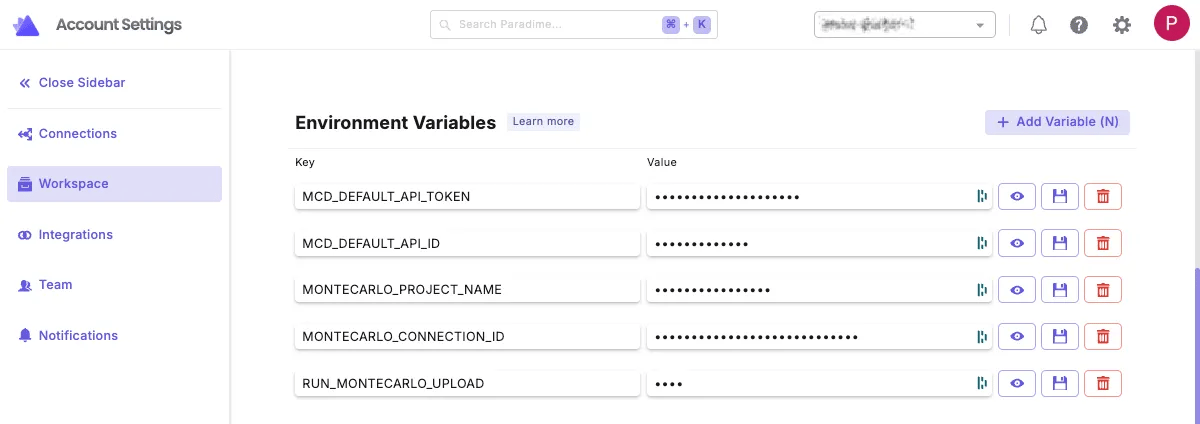
By the end of this step, your Monte Carlo environment variables should include:
 ***
### Testing the Integration
To verify the integration, run the following steps in Paradime's Bolt:
1. Trigger a Run for one of you Bolt schedule which which contains either `dbt build`, `dbt run` or `dbt test` command.
2. Verify the results in Monte Carlo:
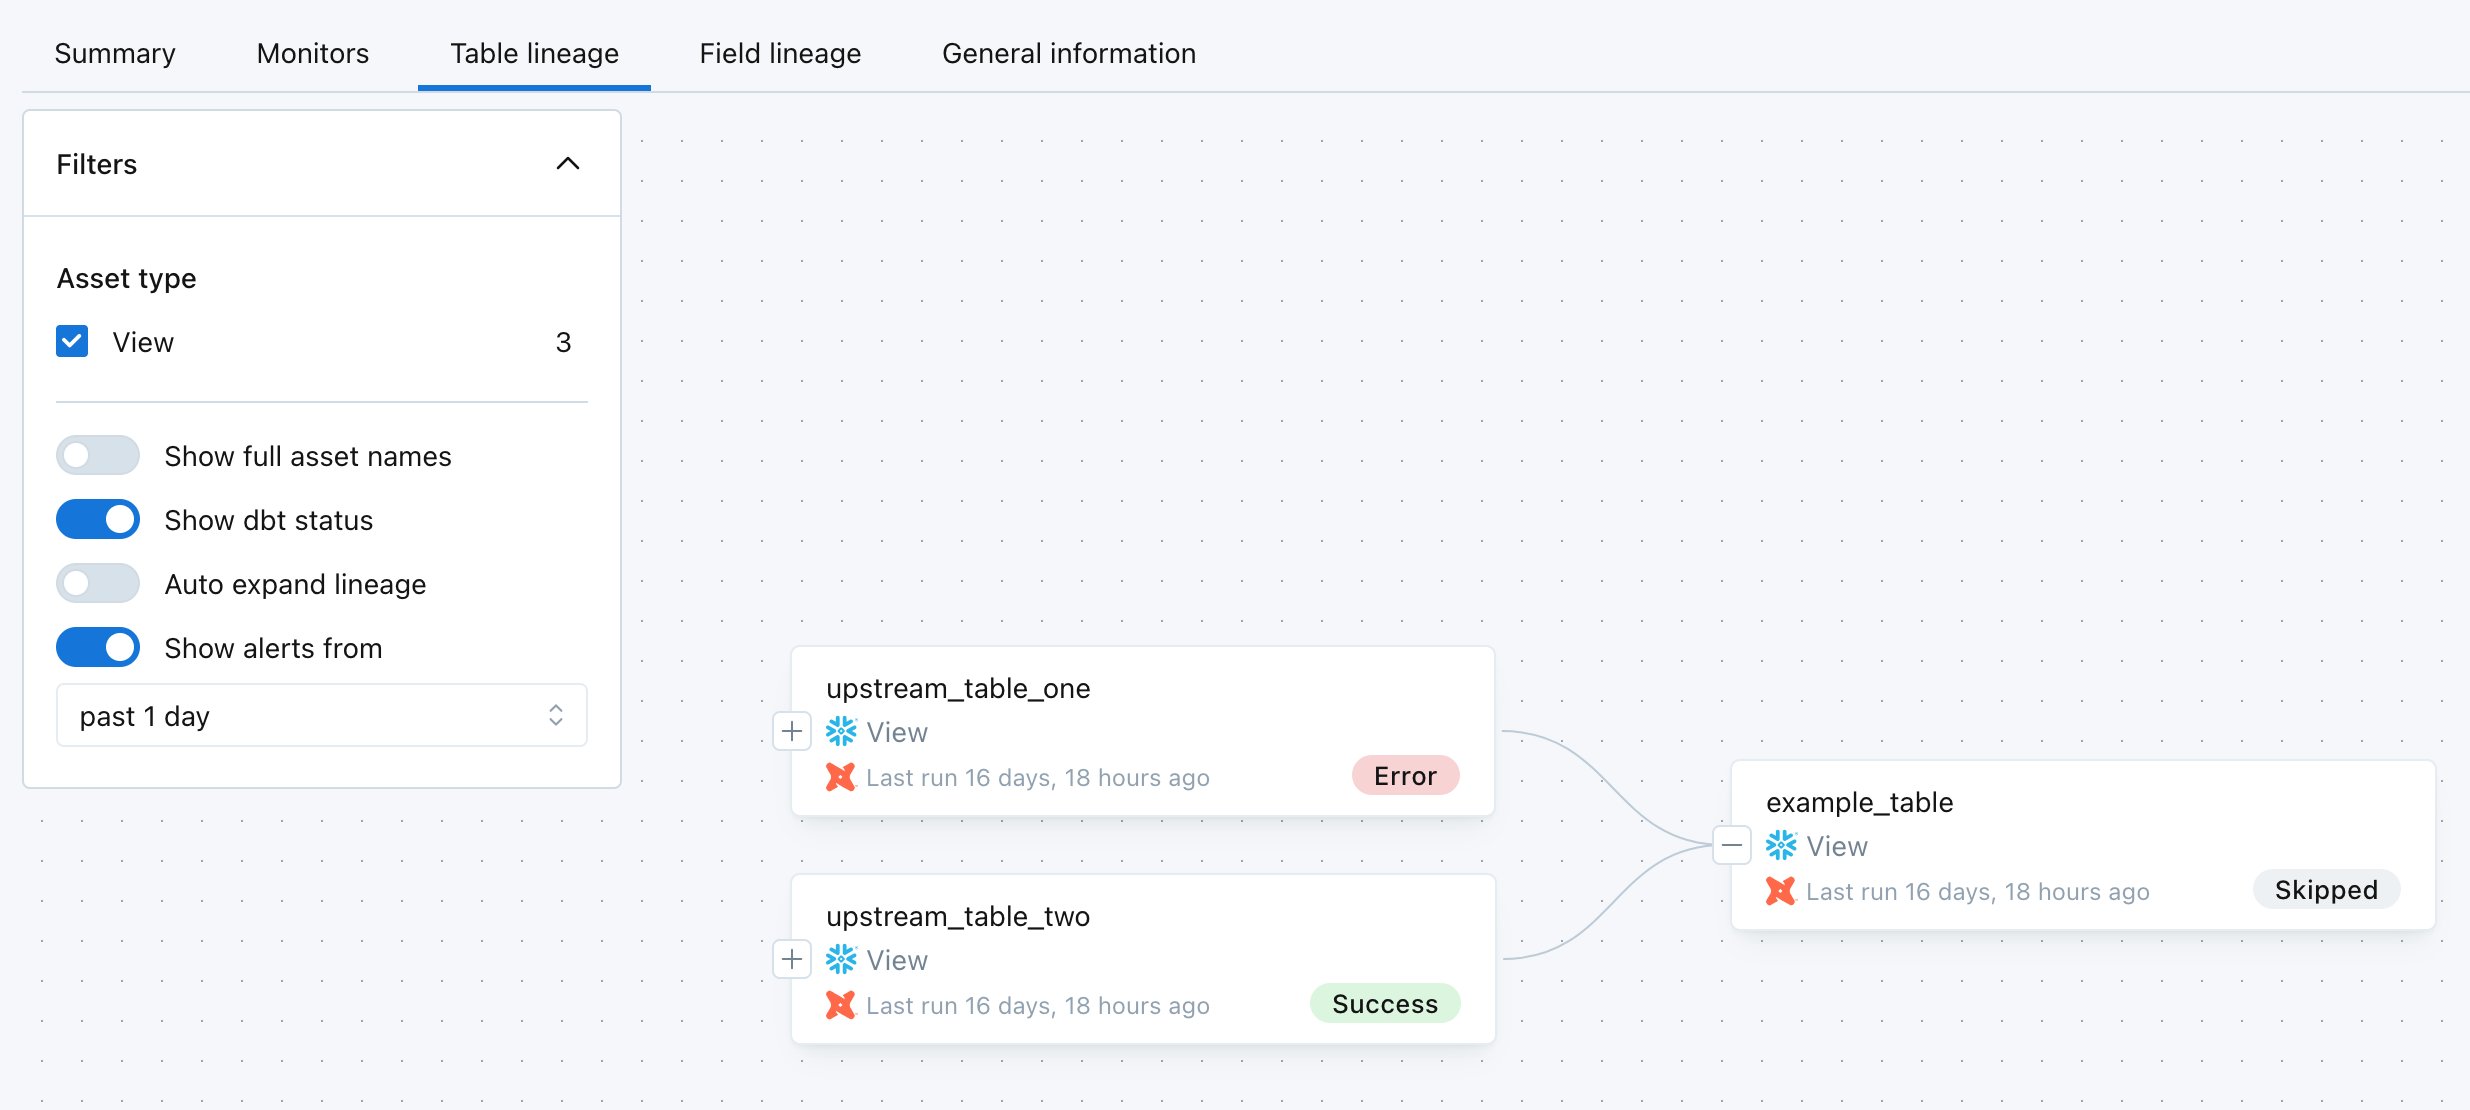
* Check the **lineage graph** for updated dbt™ context.
***
### Testing the Integration
To verify the integration, run the following steps in Paradime's Bolt:
1. Trigger a Run for one of you Bolt schedule which which contains either `dbt build`, `dbt run` or `dbt test` command.
2. Verify the results in Monte Carlo:
* Check the **lineage graph** for updated dbt™ context.
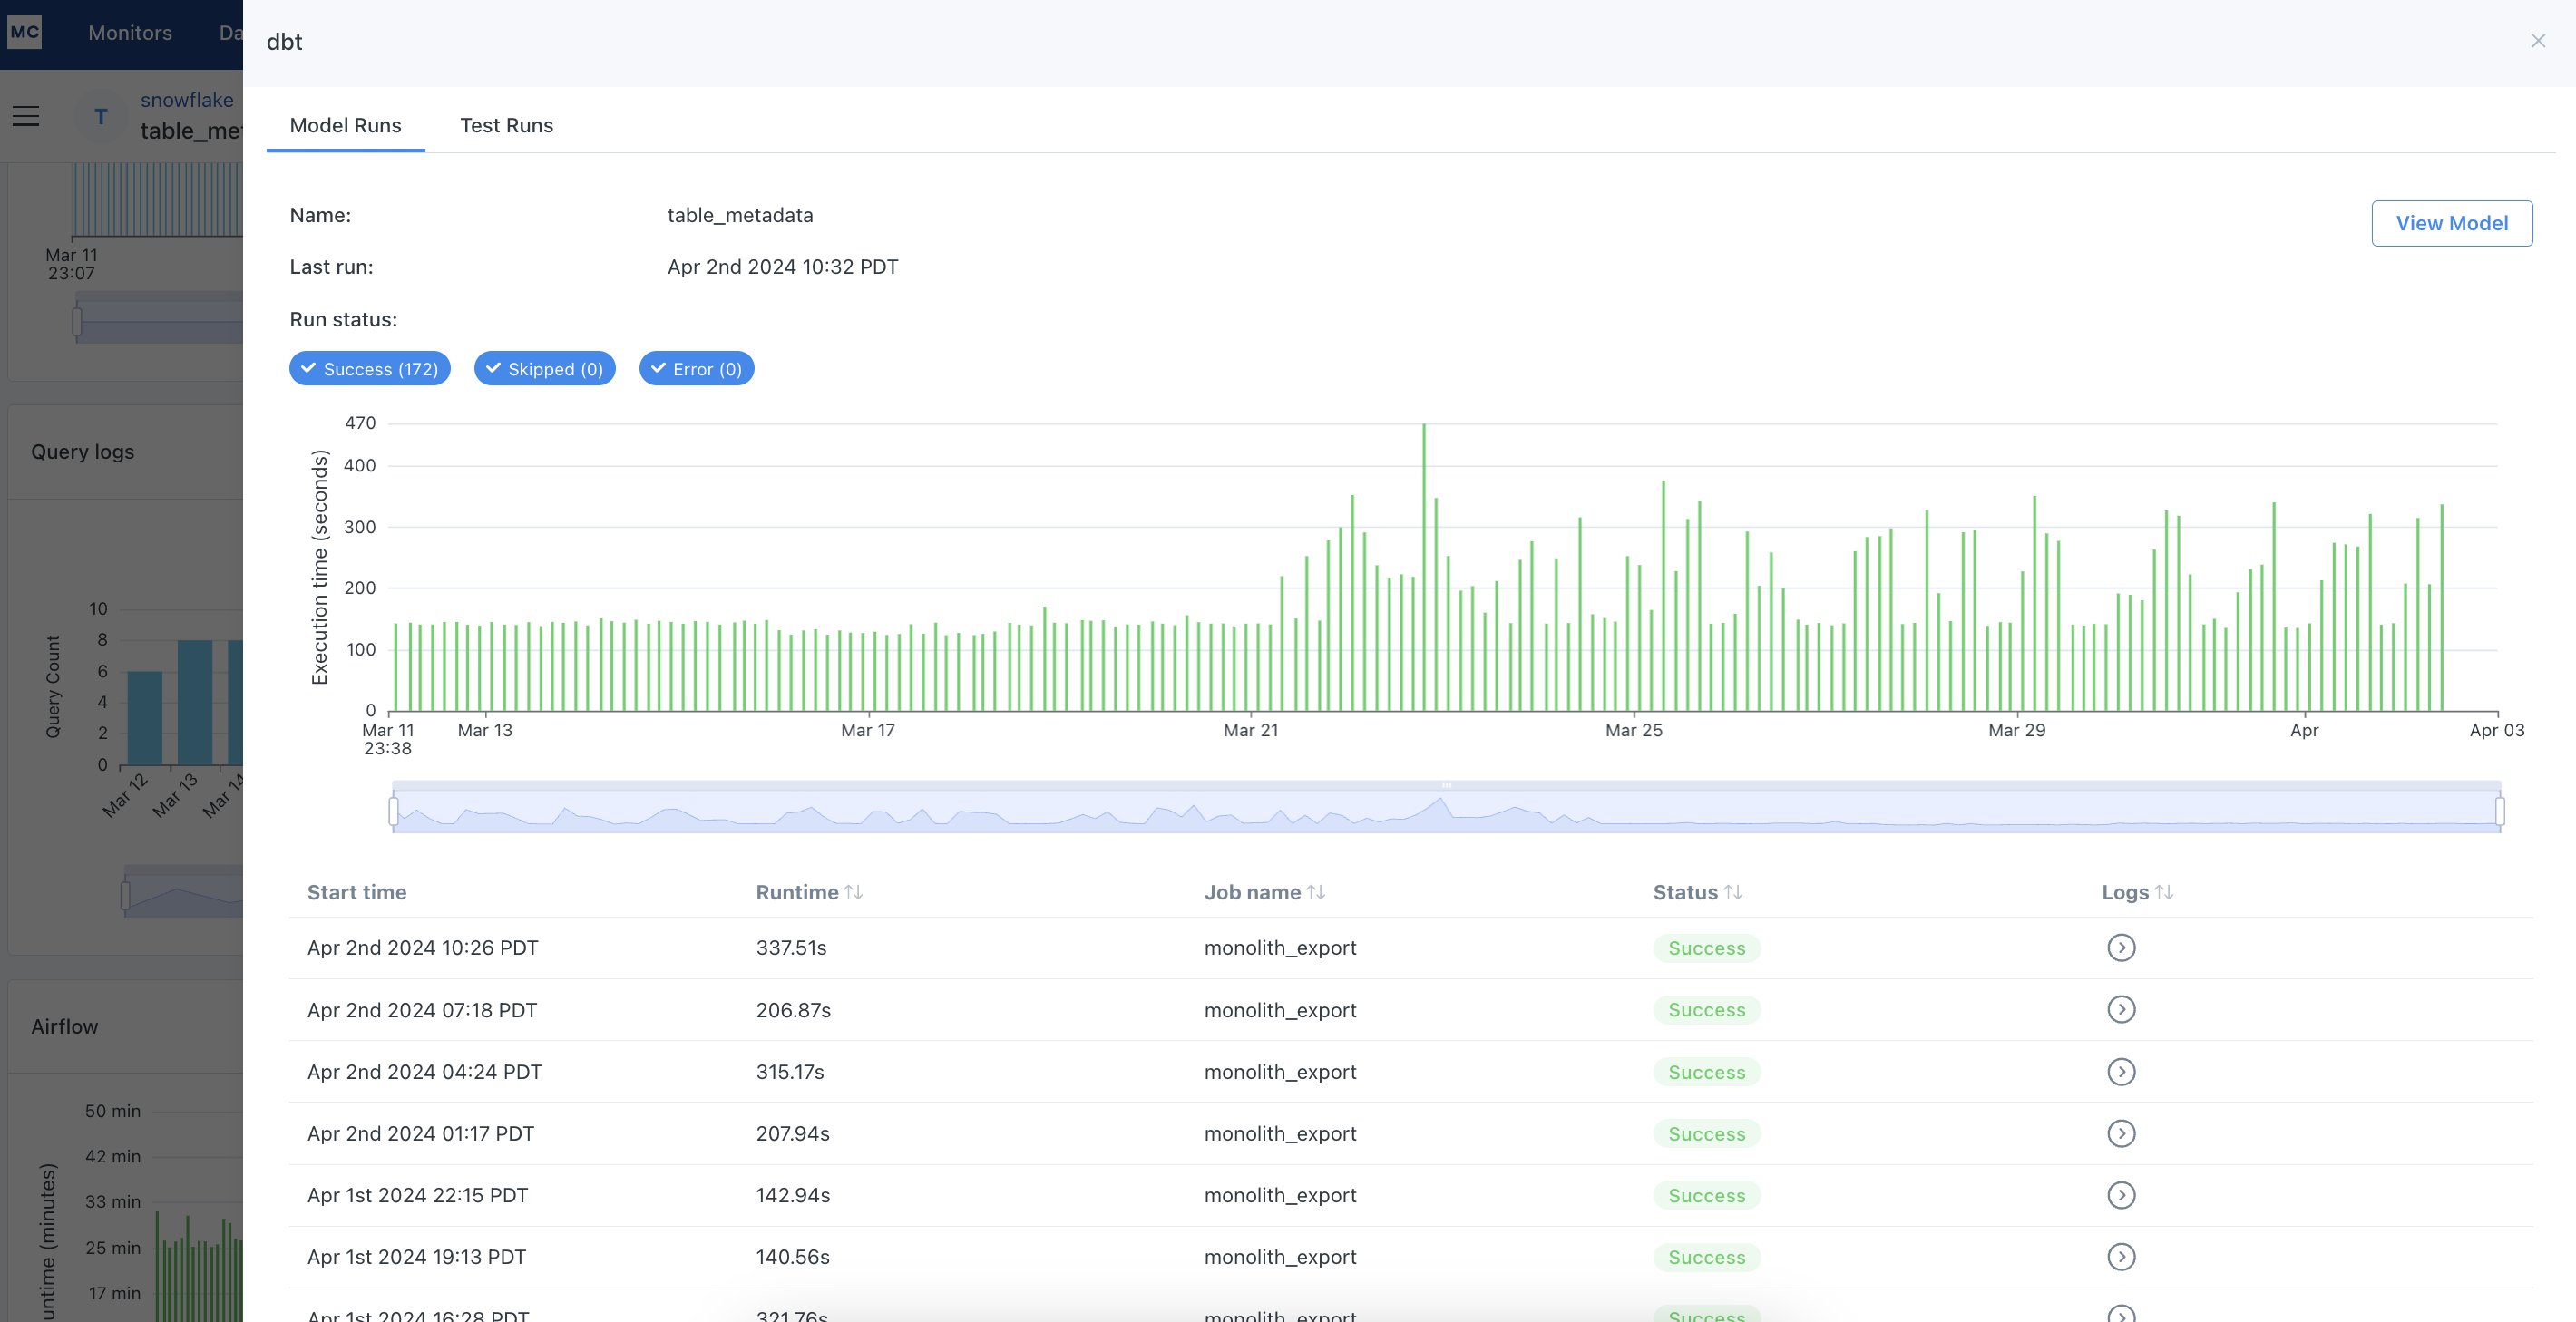
 * View job statuses, model run results, and test outcomes.
 For more details on the logs that Montecarlo will ingest check the [Montecarlo dbt integration documentation](https://docs.getmontecarlo.com/docs/dbt-integration).
## Related topics
- [Monte Carlo Commands](/products/bolt/creating-schedules/command-settings/monte-carlo-commands.md)
- [3. Command Settings](/products/bolt/creating-schedules/command-settings/index.md)
For more details on the logs that Montecarlo will ingest check the [Montecarlo dbt integration documentation](https://docs.getmontecarlo.com/docs/dbt-integration).
## Related topics
- [Monte Carlo Commands](/products/bolt/creating-schedules/command-settings/monte-carlo-commands.md)
- [3. Command Settings](/products/bolt/creating-schedules/command-settings/index.md)