

- Set up a Python pipeline project alongside your dbt project
- Extract data from Google Sheets automatically
- Load that data into Snowflake
- Run pipelines both in development and production
Prerequisites
Before starting, make sure you have:- Paradime account with access to a workspace
- Google Cloud Platform (GCP) account for Google Sheets API access
- Snowflake credentials with permissions to create schemas and tables
- Google spreadsheet with some data
Part 1: Understanding the Project Structure
Your project will look like this:Part 2: Set Up Google Sheets API Access
Why do we need this?
To read data from Google Sheets programmatically, you need API credentials from Google Cloud Platform.Steps:
-
Go to Google Cloud Console
- Visit console.cloud.google.com
- Sign in with your Google account
-
Create a Service Account (if you don’t have one)
- In the left menu, go to IAM & Admin → Service Accounts
- Click + CREATE SERVICE ACCOUNT
- Give it a name like “paradime-sheets-reader”
- Click CREATE AND CONTINUE
- Skip the optional steps and click DONE
-
Enable Google Sheets API
- In the search bar at the top, type “Google Sheets API”
- Click on it and press ENABLE
-
Create API Credentials
- Go back to IAM & Admin → Service Accounts
- Find your service account and click the three dots (⋮) under Actions
- Select Manage Keys
- Click ADD KEY → Create new key
- Choose JSON format
- Click CREATE - a JSON file will download automatically
-
Share Your Google Sheet
- Open the JSON file you just downloaded
- Find the
client_emailfield (looks like:your-service@project.iam.gserviceaccount.com) - Copy this email address
- Go to your Google Sheet and click Share
- Paste the service account email and give it Viewer access
-
Extract Credentials from JSON
Open the downloaded JSON file. You’ll need these four values:
-
Encode the Private Key
The private key needs to be encoded in Base64 format.
On Mac/Linux:
-
On Windows (PowerShell):
-
Save this encoded value - you’ll use it as
B64_BIGQUERY_PRIVATE_KEY.
Part 3: Prepare Snowflake Credentials
Why RSA Key Authentication?
For security, we use key-pair authentication instead of passwords for automated pipelines.Steps:
Generate RSA Key Pair (if you don’t have one)rsa_key.pub and copy everything between the header/footer lines.
Format Private Key for Paradime
Open rsa_key.p8 in a text editor:
Original:
- Account identifier: Found in your Snowflake URL (e.g.,
xy12345.us-east-1) - Database name: The database where data will be loaded
- Warehouse name: The compute warehouse to use
- Role: Your Snowflake role (e.g.,
ACCOUNTADMIN,SYSADMIN) - Username: Your Snowflake username
- Passphrase: [optional] if set when generating the private key
Part 4: Configure Environment Variables in Paradime
Environment variables are secure ways to store credentials without hardcoding them in your scripts.Where to Set Them:
You need to set these in TWO places in Paradime:- Code IDE (for development)
- Click Settings → Environment Variables
- Scroll to ” Code IDE”
- Bolt Scheduler (for production runs)
- Click Settings → Environment Variables
- Scroll to ” Bolt”
Variables to Set:
Google Sheets Credentials
Snowflake Credentials
Development Variable
Note: Only set
DEV_SCHEMA_PREFIX in Code IDE settings, NOT in Bolt. This ensures development data is isolated from production.Part 5: Initialize Your Python Project
Now we’ll set up the project structure and dependencies.Step 5.1: Create pyproject.toml
In Paradime’s Code IDE, at the root level (same folder as dbt_project.yml), create a new file called pyproject.toml:
- Poetry is a Python dependency manager (like npm for JavaScript)
- We’re specifying we need Python 3.11 or 3.12
- We’re installing
dltwith Snowflake support and Google API client
Step 5.2: Install Dependencies
Open the terminal in Paradime’s Code IDE and run:- Create a virtual environment
- Install dltHub and all required packages
- Generate a
poetry.lockfile (commit this to git!)
Step 5.3: Initialize dltHub
Create thepython_dlt folder and initialize the Google Sheets pipeline:
- Creates
.dlt/folder with configuration files - Downloads the Google Sheets source code
- Creates example pipeline script
- Adds a
.gitignorefile
.dlt/secrets.toml for security, so you can ignore that file.
Part 6: Create Your Pipeline Script
Replace the examplegoogle_sheets_pipeline.py or create a new file called gsheet_pipeline.py:
Understanding the Code
Function Breakdown:setup_credentials(): Handles the Google API authentication- Retrieves the encoded private key
- Decodes it from Base64
- Sets it in the format dltHub expects
get_dataset_name(): Smart schema naming- In development: Creates
{YOUR_INITIALS}_GOOGLE_SHEETS_LOAD - In production: Creates
GOOGLE_SHEETS_LOAD - Prevents dev data from mixing with prod data
- In development: Creates
load_pipeline(): The main extraction and loading logic- Sets up credentials
- Creates a dltHub pipeline object
- Configures the Google Sheets source
- Runs the extraction and loading
if __name__ == "__main__": Configuration section- This is where YOU specify which Google Sheet to load
- And which specific sheets/ranges to extract
Part 7: Run Your First Pipeline
Development Run (Testing)
- Open Paradime’s Code IDE terminal
-
Navigate to the pipeline folder:
-
Run the pipeline using Poetry:
- The script executes in the Poetry virtual environment
- Data is extracted from your Google Sheet
- Tables are created in Snowflake under
{YOUR_PREFIX}_GOOGLE_SHEETS_LOADschema - You’ll see progress logs in the terminal
Production Run (Scheduled)
- In Paradime, go to Bolt → Schedules
- Create a new schedule: name: “Load Google Sheets Data”
- Add Commands:
- Schedule: Choose frequency (e.g., “Daily at 6 AM”)
- Save and enable the schedule
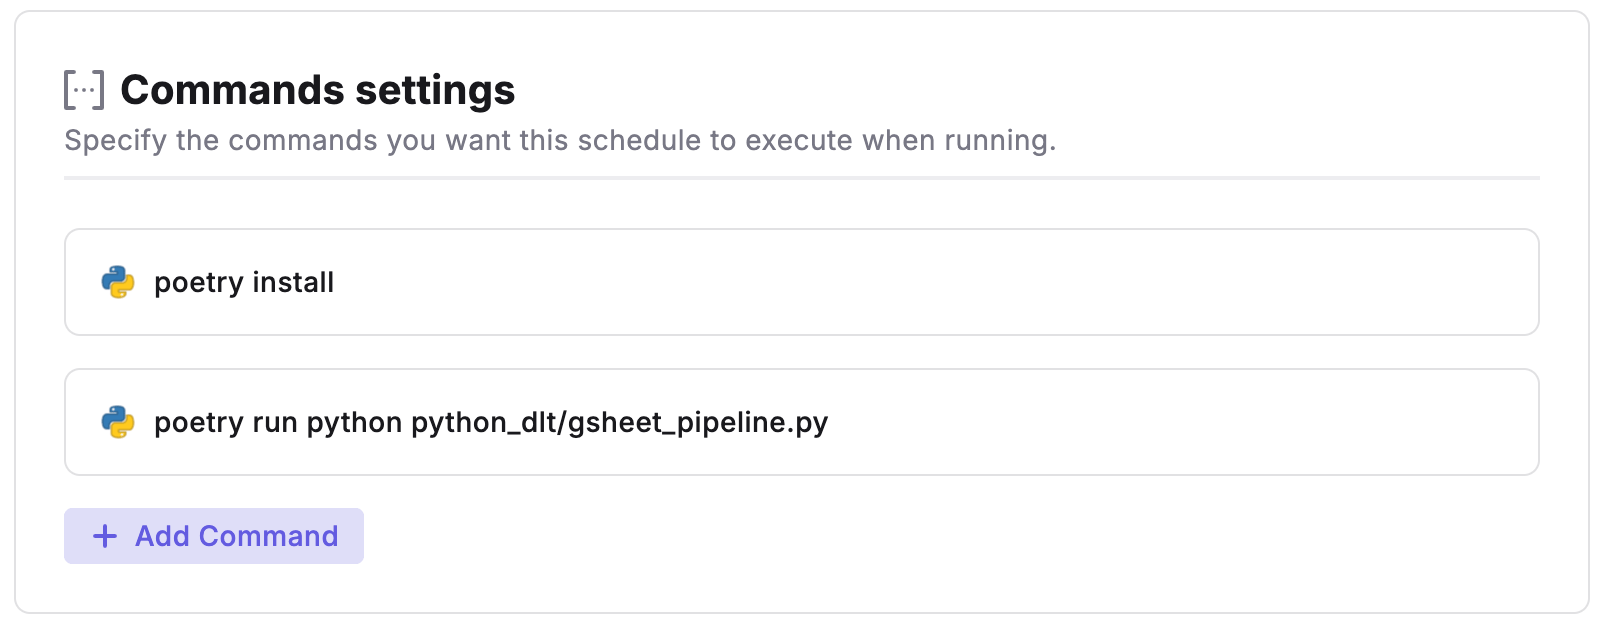
- Paradime automatically sets
PARADIME_SCHEDULE_RUN_ID - Data loads into
GOOGLE_SHEETS_LOADschema (without your prefix) - Your dbt models can now reference this data
- Runs automatically on your chosen schedule
Part 8: Using the Loaded Data in dbt
Now that data is in Snowflake, you can create dbt models to transform it:sources.yml:
Troubleshooting Common Issues
'Missing B64_BIGQUERY_PRIVATE_KEY environment variable'
'Missing B64_BIGQUERY_PRIVATE_KEY environment variable'
Cause: Environment variable not set or not accessibleFix:
- Double-check spelling in Paradime settings
- Ensure you saved the environment variable
- Restart the Code IDE to pick up new variables
'Authentication failed' for Google Sheets
'Authentication failed' for Google Sheets
Cause: Service account doesn’t have access to the sheetFix:
- Open your Google Sheet
- Click “Share”
- Add the service account email (from
client_emailin JSON) - Give at least “Viewer” permission
'Unable to connect to Snowflake'
'Unable to connect to Snowflake'
Cause: Incorrect Snowflake credentials or network issuesFix:
- Verify all Snowflake environment variables are set correctly
- Test the private key format (no headers, single line)
- Check your Snowflake role has CREATE SCHEMA permissions
- Verify the warehouse is running
Tables created but empty
Tables created but empty
Cause: Wrong sheet name or range specifiedFix:
- Double-check the sheet name spelling (case-sensitive)
- Verify the sheet exists in the Google Sheet
- Try using just the sheet name without range specifiers
'Command not found: poetry'
'Command not found: poetry'
Cause: Poetry not installed in the environmentFix:
Best Practices
1. Schema Organization
Development:- Use personal prefixes (
JD_,SARAH_, etc.) - Prevents conflicts when multiple developers test
- Easy to identify and clean up dev data
- Use clean, standard names (
GOOGLE_SHEETS_LOAD) - Apply proper access controls
- Document schema purposes
2. Pipeline Configuration
Keep it flexible:- Commit
pyproject.tomlandpoetry.lock - Track pipeline scripts in git
- Document any configuration changes
3. Error Handling
Add try-except blocks for robustness:4. Monitoring
Things to track:- Pipeline run duration
- Number of rows loaded
- Data freshness in Snowflake
- Failed run alerts
5. Incremental Loading
For large sheets, configure incremental loading to only extract new data:Next Steps
Now that you have a working pipeline:- Add More Data Sources
- Check dltHub documentation for other verified sources
- Initialize additional pipelines:
dlt init [source] snowflake
- Build Transformations
- Create dbt™. models that use your loaded data
- Add tests and documentation
- Build downstream analytics models
- Automate Everything
- Schedule your pipeline in Bolt
- Set up dbt™ to run after data loads
- Create alerts for pipeline failures
- Explore Advanced Features
- Incremental loading strategies
- Schema evolution handling
- Custom data transformations in Python
- Multiple destination support
Additional Resources
- dltHub Documentation: dlthub.com/docs
- dltHub Verified Sources: dlthub.com/docs/verified-sources
- Google Sheets API: developers.google.com/sheets
- Poetry Documentation: python-poetry.org/docs