

POST request to its URL with its secret. Use one for any tool that can send an HTTP request with a custom header, such as Jira Automation, Zapier, a CI job, or a script, without setting up an API key for the Bolt API. In the app, each incoming webhook is listed as a Trigger URL.
Before you start
- To create and manage incoming webhooks, you need the Admin, Workspace Admin, or Developer role. Anyone who can open Bolt can see them and the requests they receive.
- The schedule must be built in the Bolt UI and deployed. Schedules defined in YAML can’t get an incoming webhook from the app.
Create an incoming webhook
- Open the schedule in Bolt and click Edit.
- Under Trigger type, select Incoming webhook, so the schedule runs only when a request comes in.
- In the Trigger URLs card, click New Trigger URL.
- Enter a Name, such as the tool that will call the webhook, and click Create. The name shows on every run the webhook starts.
- Copy the URL and the Authorization header, or click Copy as curl, then click Done.
- Click Deploy to save the schedule’s new trigger type.
Call the webhook
Send aPOST request to the webhook’s URL, with the secret in the Authorization header:
- Only
POSTrequests start a run. - Send the secret only in the
Authorizationheader. A request that puts it in the URL’s query string is refused. - The request body is optional and doesn’t change the run. The run uses the schedule’s own commands and branch.
Test an incoming webhook
To check a webhook without waiting for the other tool, click Send test request on it. A test request starts a real run of the schedule, so the toast links to the run.Check deliveries
Every request that reaches a schedule is recorded as a delivery. To see them, go to Bolt > Webhooks > Incoming, or click Deliveries on a webhook in the schedule’s edit form. The Incoming tab lists every incoming webhook in the workspace with its schedule, its status (Active or Paused), and its last request. Search by name, or filter by schedule. Expand a row to see its deliveries:- Outcome: Run started, Skipped, Rejected, or Failed. Test requests carry a Test tag.
- Details: why, for example “A run was already in progress”.
- Run: a link to the run the request started.
- Received: when the request arrived.
400, 401, or 429 response, aren’t recorded.
The Outgoing tab is where you manage the outgoing webhooks that Paradime sends to other tools when a run starts or completes.
Pause, rotate, or delete an incoming webhook
Manage a webhook from the Trigger URLs card in the schedule’s edit form: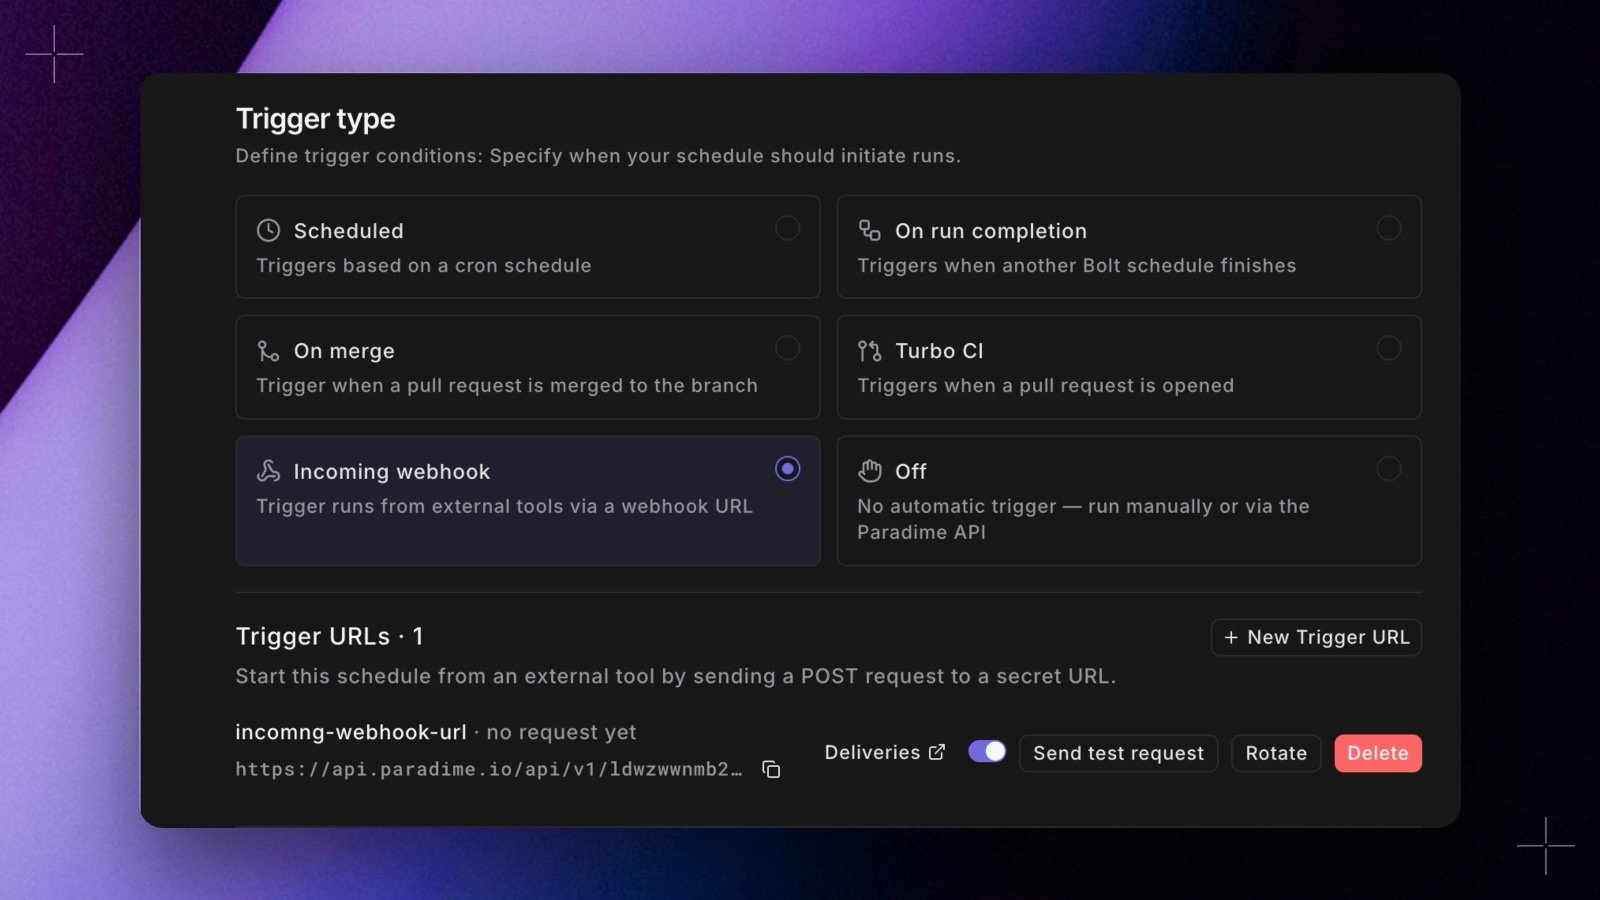
- Pause: turn off the webhook’s switch. Requests to a paused webhook get a
401and start nothing. Turn the switch back on to resume. - Rotate: confirm with Rotate secret to create a new secret, shown once. The old secret stops working immediately, so update the tool that calls the webhook.
- Delete: requests to the webhook’s URL are refused from then on. You can’t undo this.
How runs started by an incoming webhook show up
- The run page says Triggered by an incoming webhook, with the webhook’s name and a link to its deliveries.
- In the schedule list, the Trigger column shows Trigger URL, and Next run shows On request.
- Schedules set to run after this one start after a run that an incoming webhook started, as they do after any other run.
Things to know
- A request that arrives while the schedule is running is skipped, not queued.
- If you remove or rename the schedule, its incoming webhooks reject requests. They work again if a schedule with the same name comes back.
- Changing the schedule’s trigger type doesn’t delete its incoming webhooks, and they keep starting runs. Pause or delete them to stop them.